Introduction to the Kepler wallet
Discovering Keplr, the crypto wallet from Cosmos Hub.
Here we come to the article on the leading software to store cryptocurrencies and interact with DApps of this blockchain universe.
Keplr is a comprehensive and time-saving tool. In fact, the user can perform numerous operations directly from the wallet, avoiding access to external portals.
On the other hand, when the connection to a protocol becomes indispensable, security is on a fairly high standard.
Admittedly, the level of complexity rises a bit compared to other wallets such as MetaMask or Phantom. However, thanks to this guide and with a little practice there will be no problems.
Two general lines on crypto wallets and then we go into full immersion on Keplr and Cosmos!
Index
- What is a crypto wallet?
- What is Keplr wallet?
- How to install Keplr wallet
- Blockchains supported by Keplr wallet
- How to send and receive cryptocurrency
- Stake crypto Keplr wallet
- Governance blockchain and Keplr
- Kepler crypto wallet settings
- Overview of IBC transfers
- Keplr wallet: promoted without reservation!
What is a crypto wallet?
The crypto wallet is the virtual place where we can store the private keys of our cryptocurrencies and be the sole managers and owners of them. Without it, we could not store capital, send it, receive it and interact with the many applications available.
There are two types of wallets: custodial and noncustodial.
With custodial wallets we delegate ownership of our currencies to the exchange, although of course we will be able to use them.
In contrast, through noncustodial wallets we retain ownership of the cryptos as well as responsibility for the private keys.
Understanding the diversity between these two wallets is critical to being clear about the rights and duties we will have over our digital currencies.
Having made this quick introduction we can move to the subject of the article: the Keplr wallet.
"Custodial or noncustodial? Let's learn the difference well before jumping into the crypto world!"
What is Keplr wallet?
Keplr is a non-custodial wallet that supports blockchain and applications from the immense Cosmos landscape .
Also available in a mobile version for Android and iOS devices, Keplr is mainly used through its Chrome browser extension. In this in-depth discussion we will focus precisely on the latter.
In general, it is a rather well-built tool that allows you to perform various actions.
Obviously, the main task of Keplr is to safely store our cryptocurrencies. We can rest assured on this point: the private keys are stored locally, so that the risks associated with their spread are eliminated at the root.
In addition, the seed phrase can consist of either 12 or 24 characters. While the former variant already offers robust security, the latter guarantees an extreme degree of entropy; in short: no one will ever be able to “play guessing game” and find the valid combination; it would take billions of years.
Another obvious function is the sending and receiving of cryptocurrencies. We will find out how to do this in a few paragraphs.
However, Keplr is at its best when it comes to interfacing with applications of the various blockchains. Indeed, this wallet can interact with a variety of networks and related protocols developed on them.
Moreover, Keplr is the means by which we can stake cryptocurrencies and manage their positions. Same for governance: everything is done from here, without going out to other platforms.
Finally, last but not least feature, support for IBC (Inter-Blockchain Communication protocol) transfers.
Cosmos makes it possible to create networks that are independent but at the same time communicate nimbly with each other. Thanks to IBC, users can move funds from one chain to another; imagine it as a bridge but without using any platform, also avoiding synthetic deposits and tokens.
Keplr allows these operations to be carried out with relative ease; however, care must be taken to avoid making mistakes.
We can be users of Osmosis, Cosmos Hub or Crypto.org (the blockchain of Crypto.com) but nothing changes: Keplr is the ideal wallet for these and many other supported networks. So let’s see how to install and use it properly.
How to install Keplr wallet
Let’s install the Keplr Chrome extension step by step.
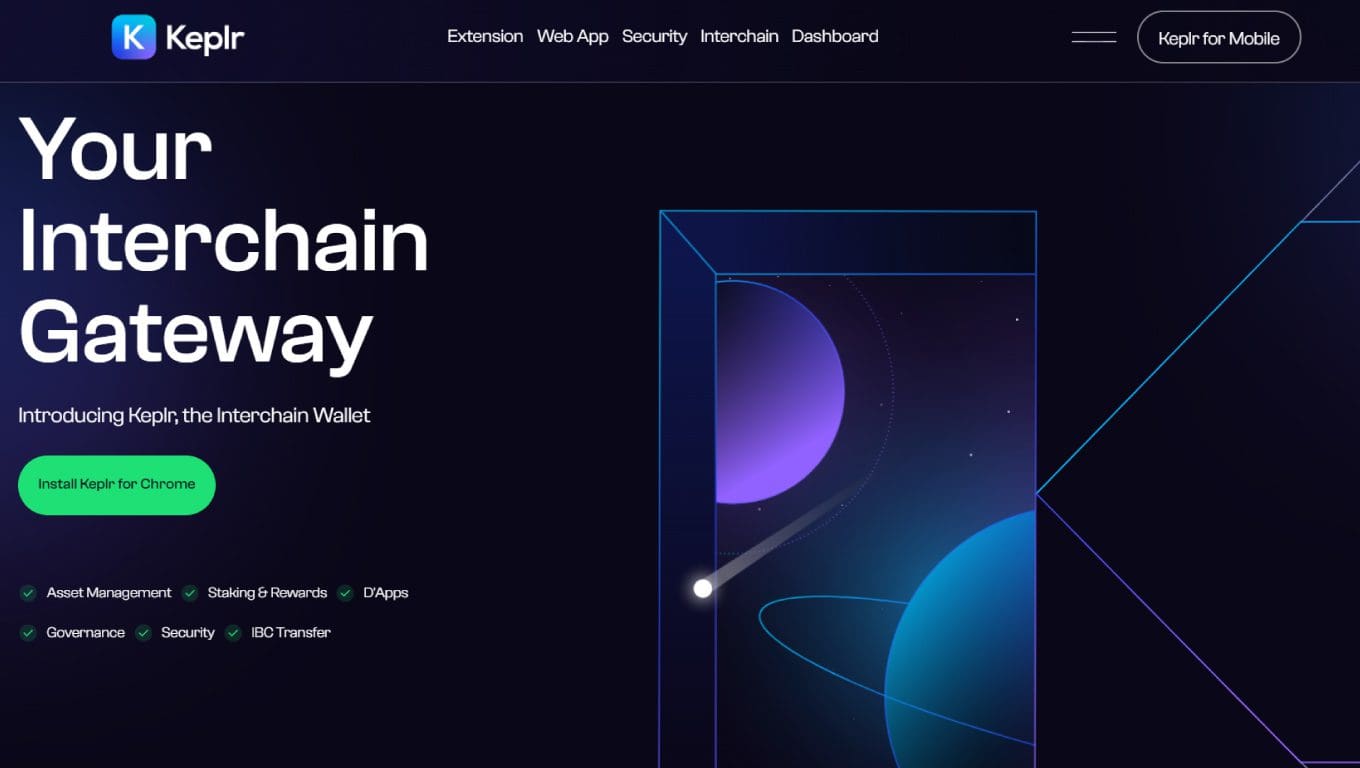
First let’s go to the official website keplr.app. After that, let’s click on the big green button from the word Install Keplr for Chrome. We will be redirected to the Chrome Web Store, where all we have to do is click on the install button. A few seconds of waiting and it will be completed.
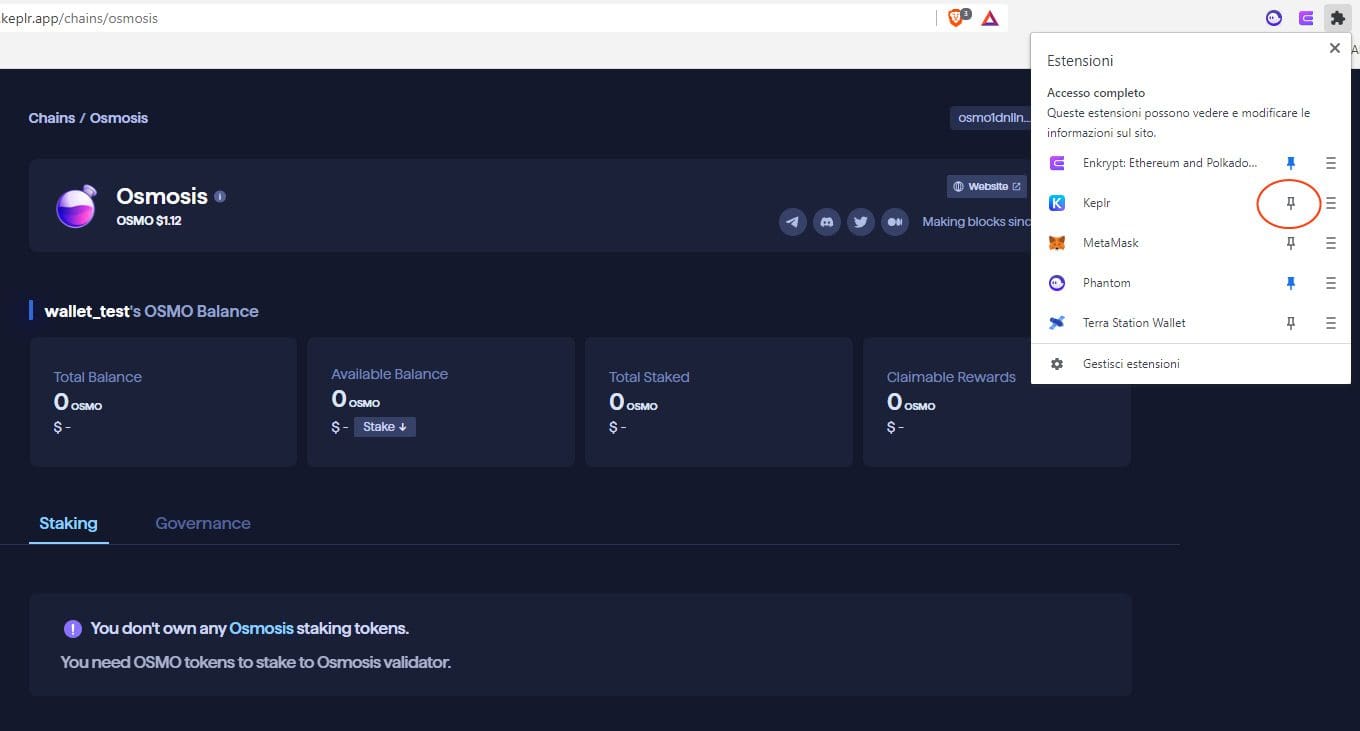
Having arrived at this point we will have to start Keplr wallet. To do this, it will be necessary to click on the icon depicting the white “K” on a blue and light blue background, located on the browser bar in the upper right corner. In case we don’t see it, let’s click on the puzzle piece, search for Keplr and fix it on the bar via the thumbtack icon. A picture explains better than a thousand words:
Okay, now let’s log into Keplr to start the creation of a new wallet. The steps are quick: 2 to 3 minutes and we will be up and running.
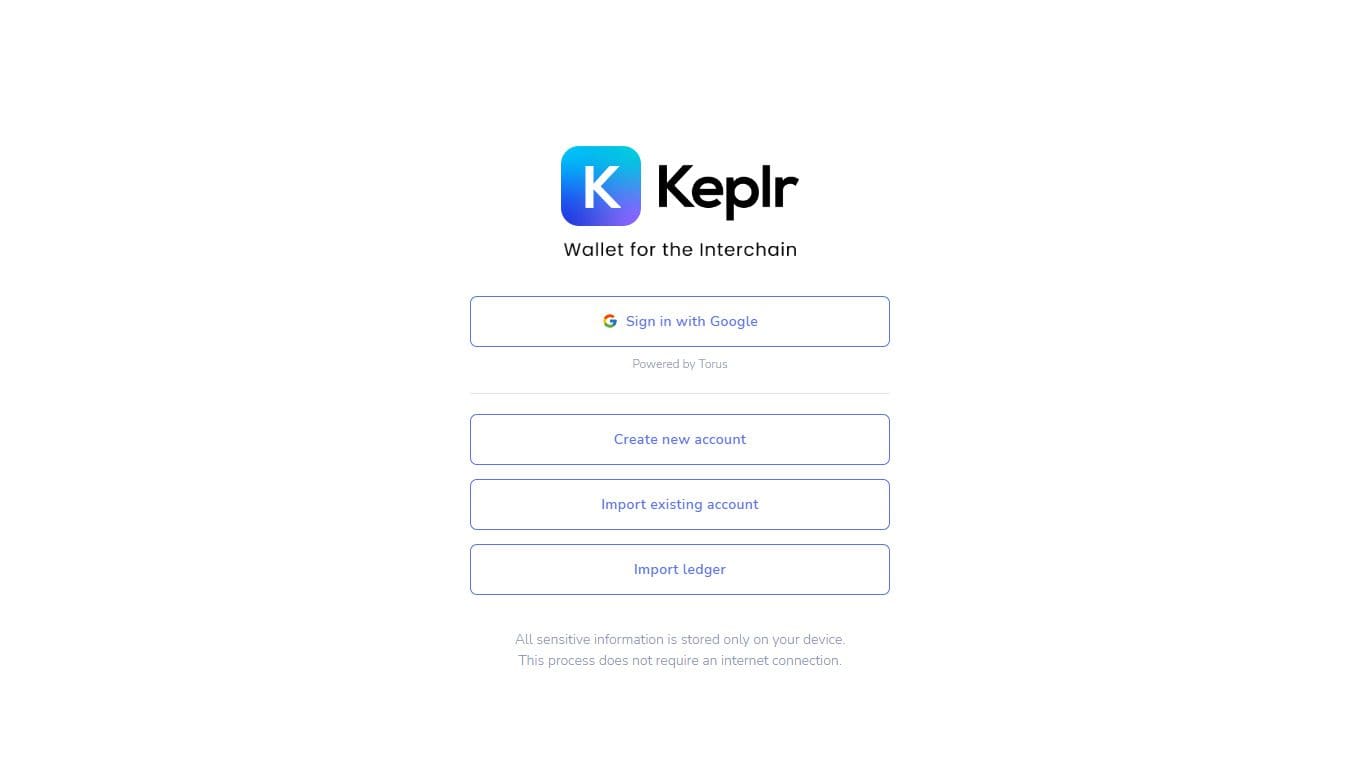
From the screen shown above, we click on Import existing account if we already have a seed phrase. We could also opt for Ledger if we already used one. If you want to go deeper, check out our article on hardware wallets.
However, in the case of this tutorial we will have to choose Create new account: let’s click it!
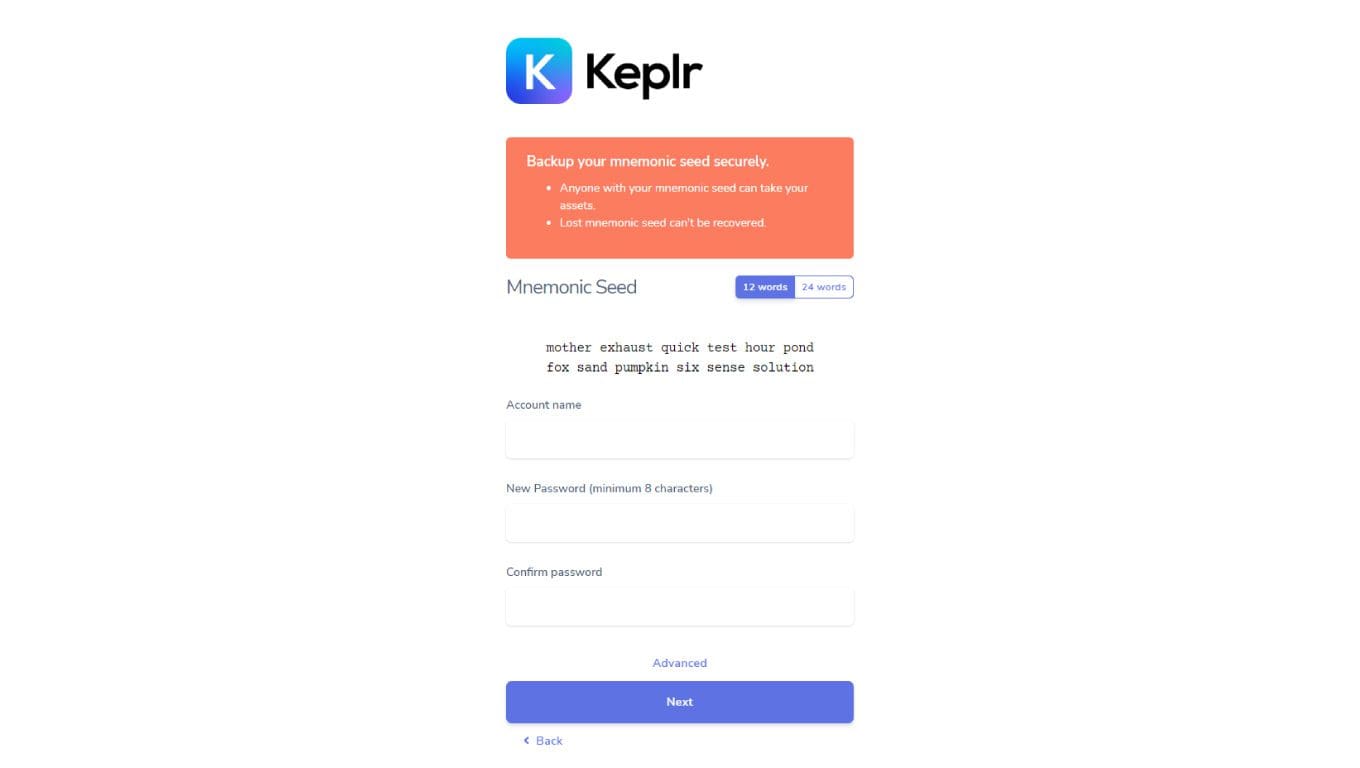
First, we transcribe and store in a safe place the seed phrase (here called mnemonic seed) because it will be the only means by which we can access our funds in case of problems. Never share this phrase with anyone and avoid keeping it stored on PCs, smartphones and tablets.
We then give our account a name and choose a password. This will be required of us whenever we want to access Keplr on this device. If, on the other hand, we would like to use it on other computers or smartphones, we will need to import the wallet via the seed phrase.
After pressing Next, well, we will already be done: we will just have to bring back the seed phrase to perform the security check.
We promised simplicity and so it was; we can continue with the exploration.
Blockchains supported by Keplr wallet
We said that Keplr is developed for the Cosmos ecosystem . Therefore, any project built through the Cosmos SDK supports this wallet.
Cosmos Hub is rightly the first name that comes to mind, to which, however, many other chains are added including:
- Osmosis, network of the eponymous DEX, port to which almost all Cosmos sailors dock.
- Crypto.org, the first blockchain of the famous Crypto.com exchange (referral here to sign up and get up to $50 free).
- Kava, chain layer-1 that is extremely fast and leverages in combination the best solutions from Cosmos and Ethereum.
- Sentinel, a protocol designed to bring private, censorship-proof dVPN networks to life.
- Celestia, interesting network launched in late 2023.
The list is much longer but includes numerous small and experimental entities.
The beauty of Cosmos is precisely this: hosting totally different projects and still managing to provide all the necessary support.
Keplr successfully fits into this context, establishing itself as a versatile wallet capable of meeting the needs of each user.
"Cosmos is a true universe for blockchain, where projects intersect with each other while being independent"
How to send and receive cryptocurrency
In addition to storing one’s cryptocurrencies, a wallet must facilitate their movement. Keplr aligns with other well-known names and allows you to send coins and tokens in two simple steps.
Let’s start with the main screen of the Keplr browser extension.
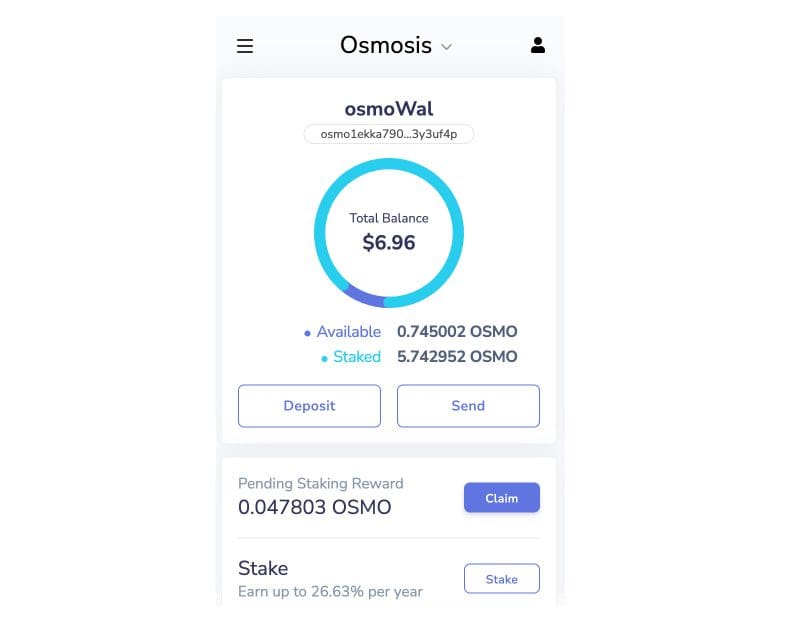
The Osmosis label positioned at the top indicates which blockchain we are connected to. By clicking on it we will be able to change it via the list that will come up.
After choosing the network, we press the Send button so that we can see the screen that follows.
Short digression: by selecting the Stake button we will be redirected to the Keplr Dashboard, we will see it in the next section; the Claim button, on the other hand, will allow us to claim the rewards from the stake.
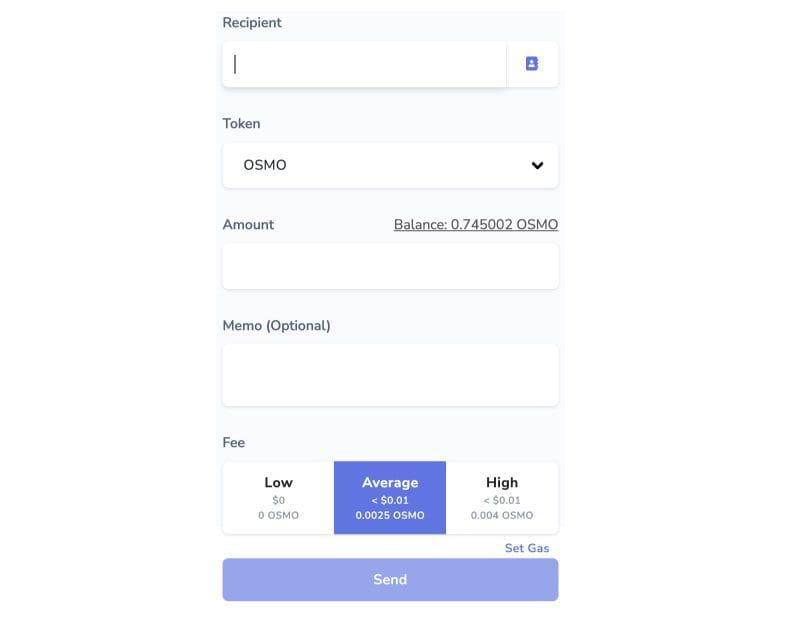
By filling in the fields visible in the image we will be able to arrange the sending of one of our cryptos.
Starting from the top, in Recipient we will have to paste (or write) the recipient’s address. We recommend copy-pasting to avoid transcription errors; always remember that a mistake would be irreparable because transactions in the blockchain are irreversible.
Under Token you will instead have to indicate which currency we wish to move. Just click on the field to open the dedicated drop-down menu.
Next comes Amount, that is, the amount to be moved. So far it is all pretty similar to when arranging a wire transfer: we have filled in the recipient’s address (a bit like a bank IBAN, just to be clear), the currency and the amount.
The Memo field is not always mandatory. It usually becomes so when we need to send funds to an exchange that requires it. We will find this reference in the deposit directions of the platform in question (e.g., Binance, for example). If it is provided, let us remember to fill it in. In case, on the other hand, it is not indicated, we leave it blank.
Penultimate step, the fees: for a quick transaction, we choose High and pay a little more to receive priority. Low does the exact opposite, while Average represents the best compromise. The beauty is that the costs are still negligible regardless of the choice.
If all is well, we hit Send and approve the transaction: job complete!
To receive or deposit cryptocurrencies we have two ways.
The first is to click on our address (highlighted in the image below), so we can copy and paste it elsewhere, send it via email, message, and so on.
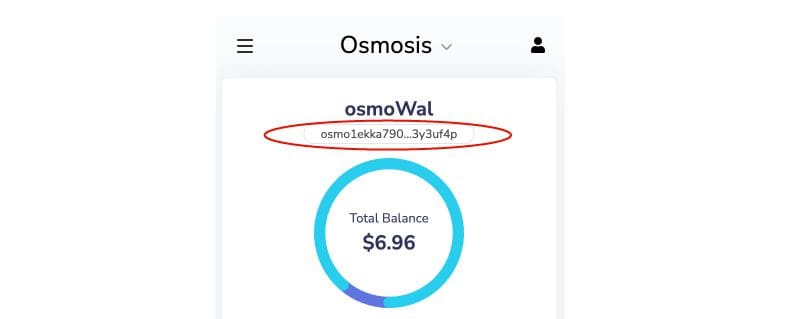
The second way is the QR Code: we click on the Deposit button to display and scan it.
Sending and receiving cryptocurrencies via Keplr turns out to be quick and easy, without any complicated surprises.
Stake crypto Keplr wallet
Staking cryptocurrencies directly from the wallet? With Keplr you can and it’s easy too!
To proceed, first we need to access the wallet. After that we go to wallet.keplr.app; this way we will be able to take advantage of all the features offered by the software.
On the left side we will see a list of all available blockchains. Let’s pretend we want to stake OSMO coins and then click on the Osmosis chain.
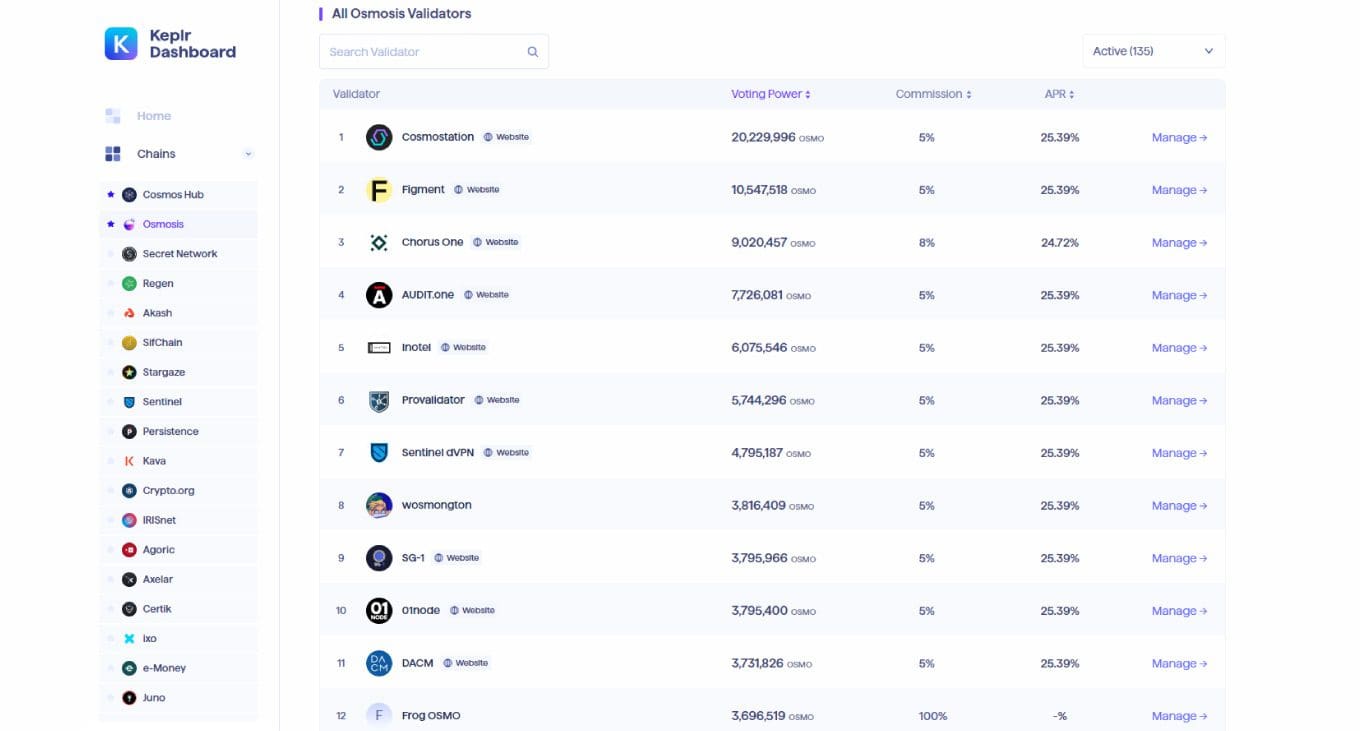
Here appears the list of all validators available on this network. We will have to choose the appropriate one, considering the following aspects:
- Commission: the higher it is, the lower the amount that will enter our pockets. Be careful, however, not to base the choice solely on this parameter.
- APR: as the amount increases, the annuity rises .
- Voting Power : better to opt for the least powerful, so as to favor decentralization as much as possible .
- Uptime: this item is not visible in the list but we will have to go look for it on the site of the validator in question. We try to delegate our cryptocurrencies to those that are as close to 100 percent as possible. Be careful: validators with low uptime suffer more penalties that fall on the stakers.
To summarize, we try to find the right compromise between these four points with an eye on fees and uptime.
Returning to the procedure, clicking on the Manage label of a given validator opens this pop-up window:
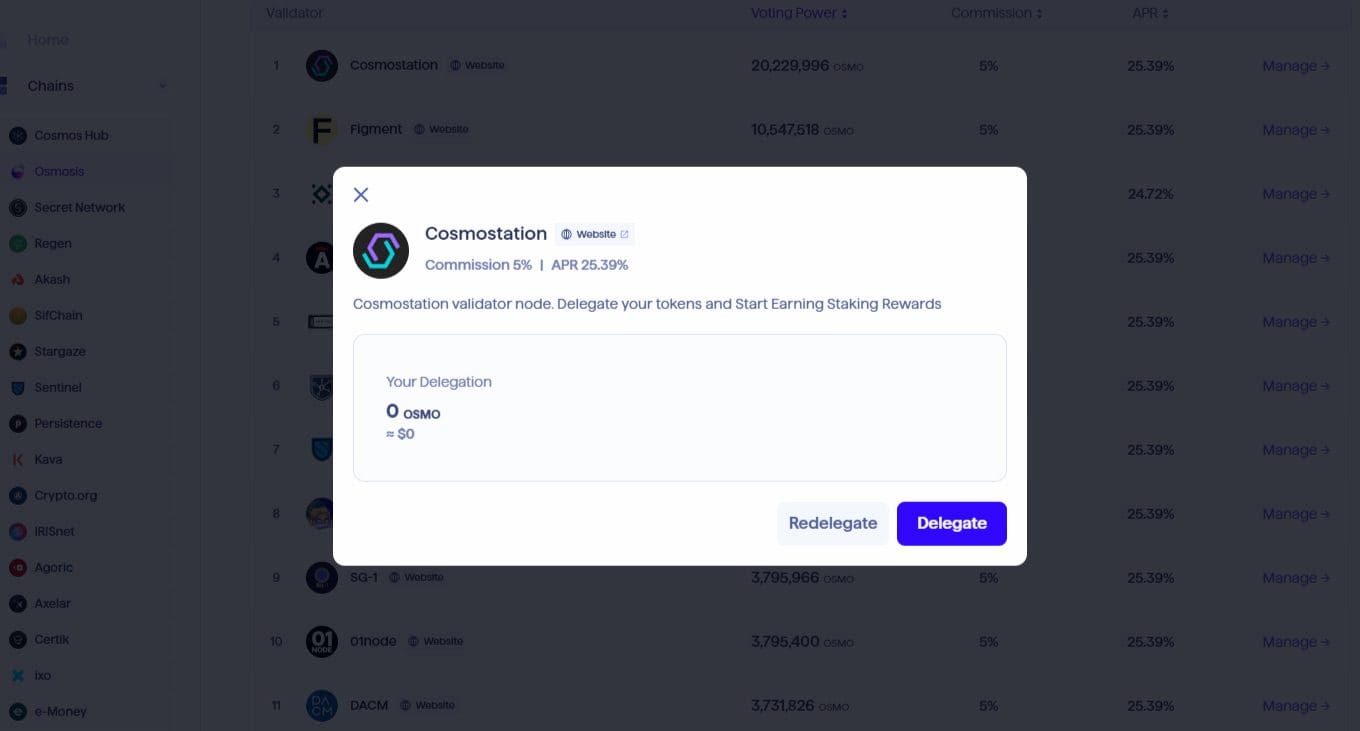
If we had already delegated coins to the validator we would see the amount under the heading Your Delegation.
By clicking on the Redelegate button we will have a way to regain possession of the funds, as well as be able to move them elsewhere.
Instead, by clicking on Delegate we will access the following window, from which to indicate the amount of coins to be staked in the input area located further down.
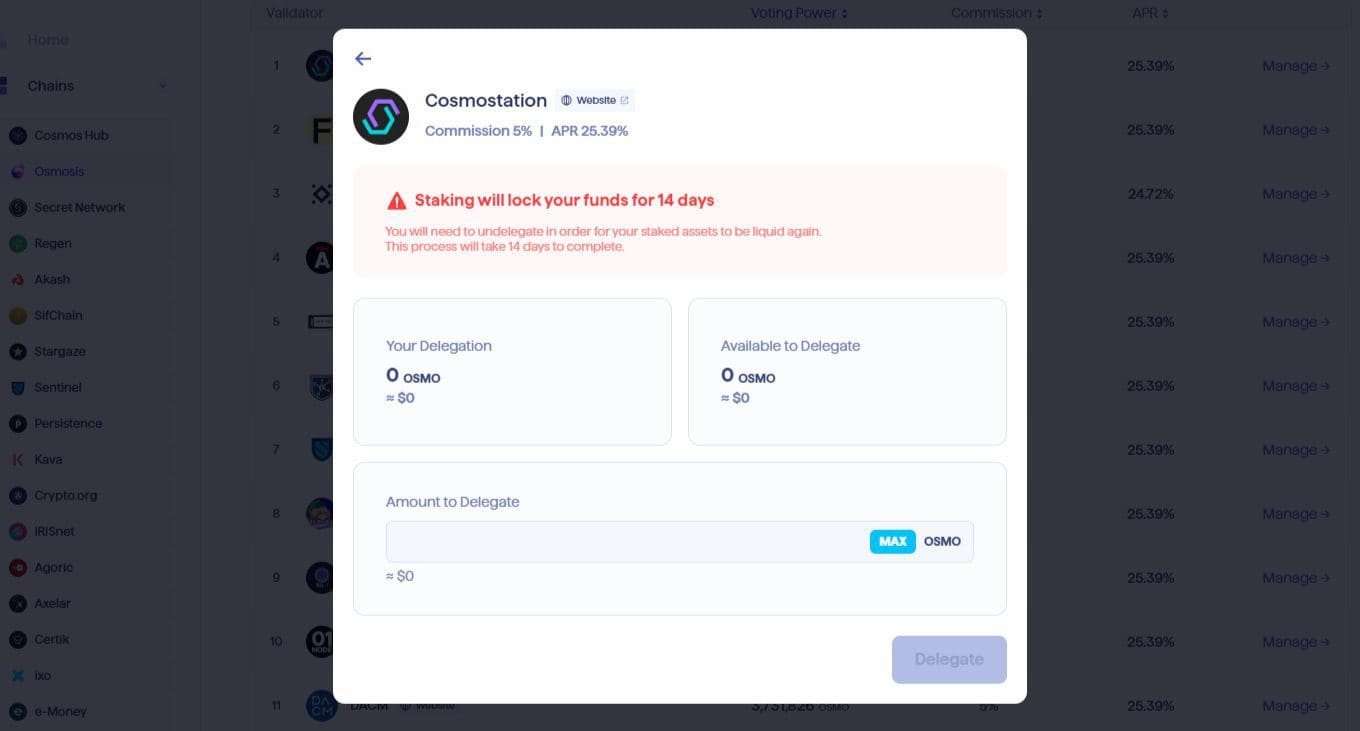
All done, we press the Delegate button and confirm the transaction to conclude the deal: congratulations, cryptos are in stakes and already generating passive income!
Governance blockchain and Keplr
Earlier we also highlighted the possibility of participating in the governance of blockchains that provide for it. Let’s then find out the steps to take in order to exercise one’s right to vote.
First, governance generally works with the “more crypto, more voting power” ratio. Therefore, the owner of 100 ATOM (Cosmos HUB coin) will have less weight than the one who owns 200, just to give an example.
The platform can be accessed from wallet.keplr.app, the same as seen in the previous section on cryptocurrency stakes. This time, however, after selecting the network of our interest we will have to click on the word Governance, visible in the following image.
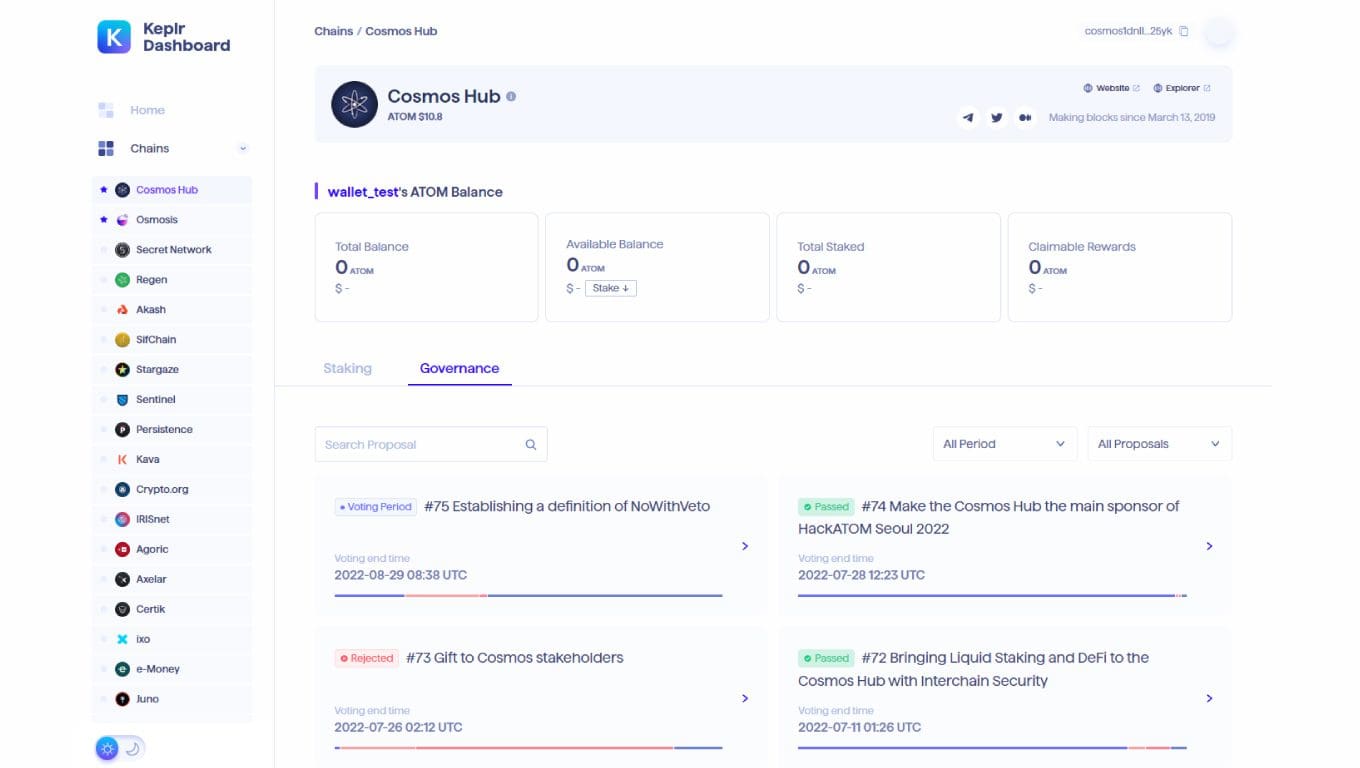
Here we will have a way to view all proposals, whether active or completed. For the latter we will be able to inquire, see the result and find out the contents.
If we wanted to participate in a vote we will just click on the relevant box. Keeping the image as an example, we will click on #75 Establishing a definition of NoWithVeto.
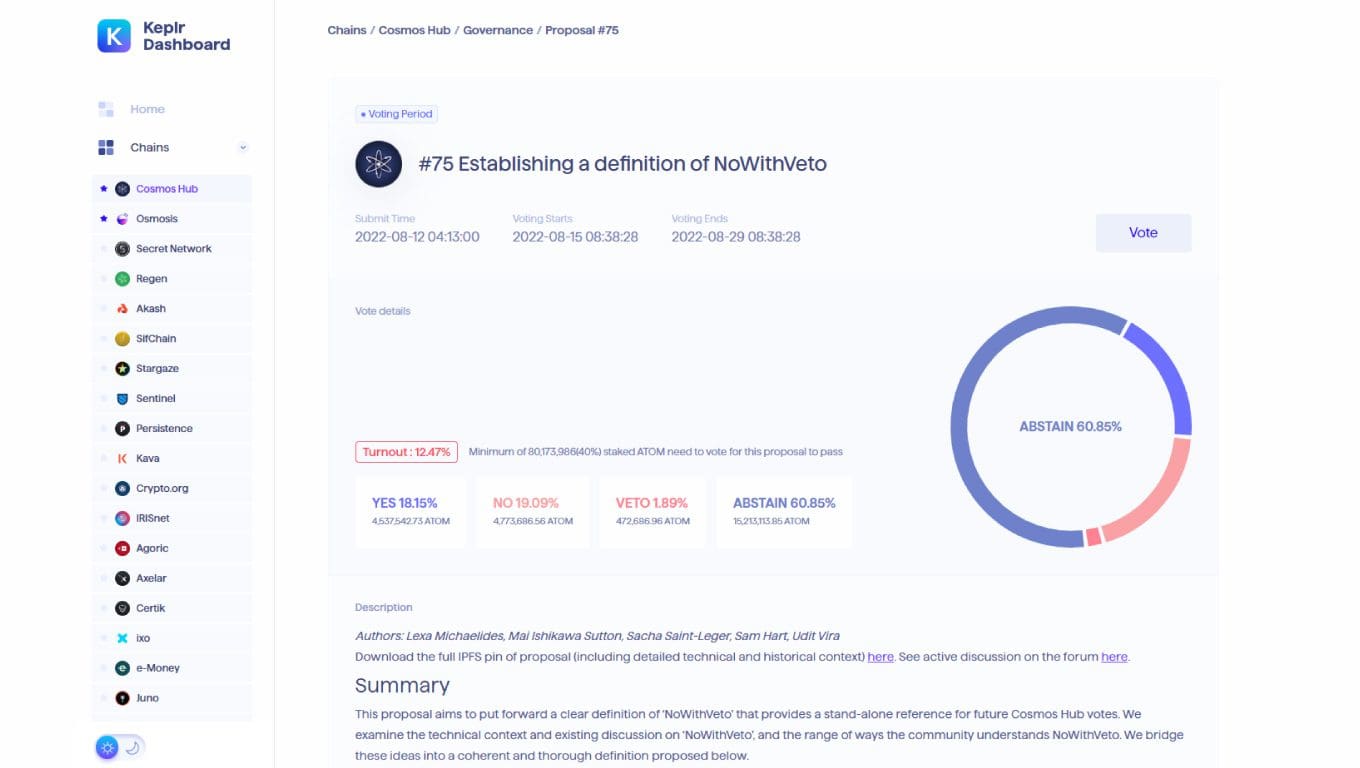
On the dedicated page we will be able to read in detail what the proposal provides and the current voting situation.
Using the Vote button , located in the upper right area, a pop-up window will open in which to express what we want. We confirm and approve the transaction to conclude the transaction.
Many coin holders do not participate in governance but many of them are even unaware of its existence. Those who believe in a project and have a long-term mindset should take a look at the situation from time to time, perhaps voting on the most significant and impactful proposals. In any case, there is no obligation and we are free to move as we see fit; sometimes, however, governance can increase an airdrop allocation …
Kepler crypto wallet settings
A look at the settings of a crypto wallet never hurts. Let us therefore discover those of Keplr.
To reach the dedicated section, we click on the three horizontal dashes located to the left of the blockchain in use. After that, we click on the word Settings.
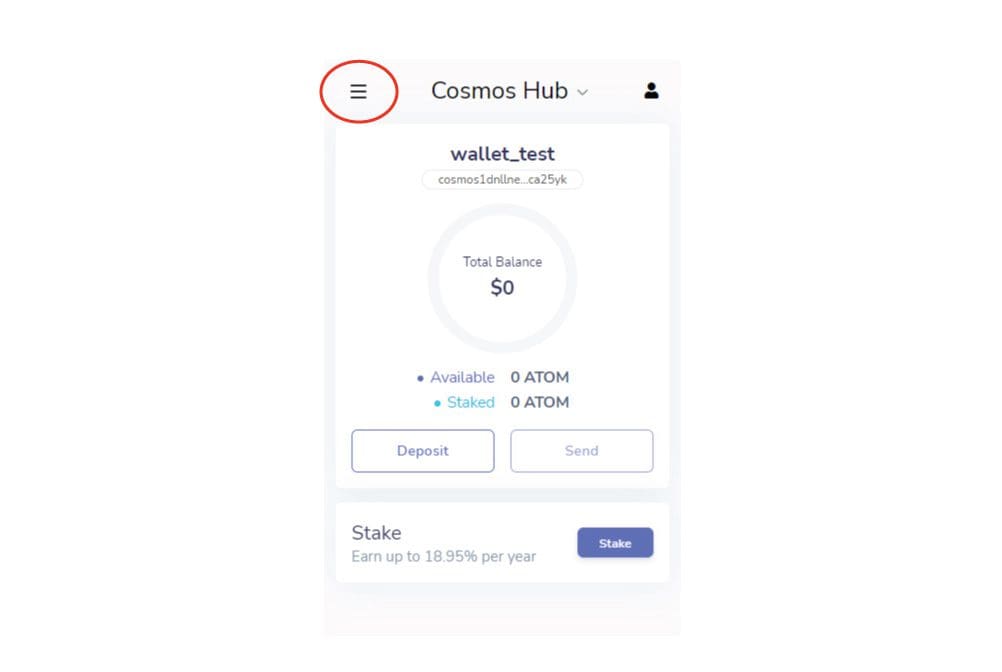
As the first item we will find the one dedicated to changing the language. However, Keplr supports only two idioms: English and Korean. So, except in special cases, it is likely that we will have to ignore this item.
Next is the base currency. The starting settings select the U.S. dollar but we have the option to change and indicate the euro. Here the choice is up to the user, depending on whether you are used to thinking in USD or EUR when it comes to cryptocurrencies.
Manage Connections allows you to view the authorized connections to our Keplr wallet, broken down by network. This is a useful feature for deleting suspicious applications or applications that we no longer use.
Through Link Keplr Mobile we will get a QR Code to scan with the mobile app in order to import the wallet. As always, we recommend caution when using your smartphone to trade cryptocurrencies.
Endpoints allows you to vary the node we are connected to. Command to ignore if you are not aware of what you are doing.
Show Advanced IBC Transfers throws us into the world of inter-blockchain transfers. In the next section we will understand what they are.
Before we close, let’s go back to the image above and click on the icon to the right of the blockchain name. From here, via the Add Account button we will be able to create a new wallet if needed. Through Keplr’s browser extension or mobile app we will be able to freely access all of our wallets.
Overview of IBC transfers
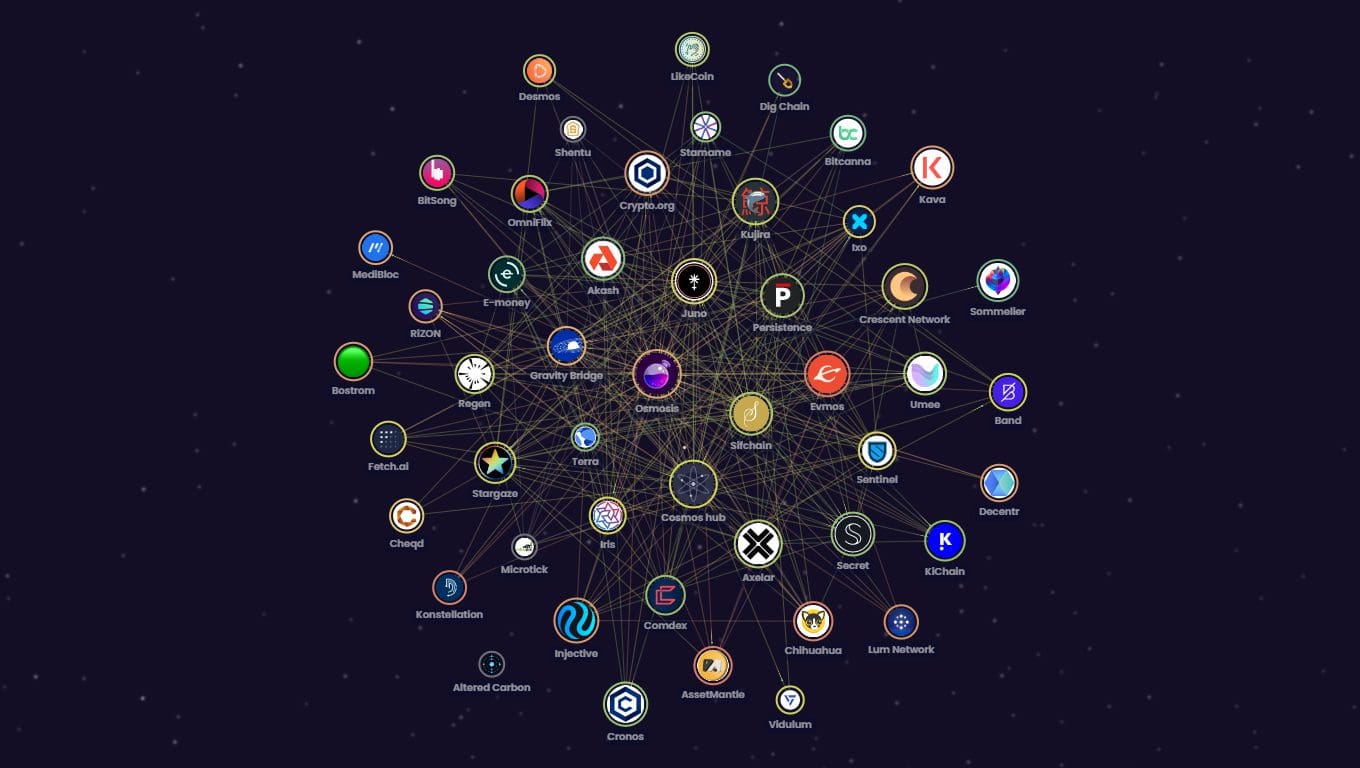
The acronym IBC stands for Inter-Blockchain Communication (protocol) and is a key feature of Cosmos.
The platform serves as the basis for the construction of several layer-1 networks, completely independent of each other. To put it bluntly, if Osmosis “exploded,” all the other chains part of Cosmos would not even notice.
However, independence does not translate into a closed system, and this is where the IBC protocol comes in. Through it, networks can interact with each other naturally and securely. More concretely, the user is able to transact inter-chain, move coins and tokens, move other data, and so on.
Cosmos blockchains are thus part of an interconnected super-network; this is precisely one of the aspects that makes Cosmos so interesting.
Keplr wallet supports the ecosystem’s blockchains; by now we understand this perfectly. At the same time, this tool makes IBC exchange of coins and tokens possible.
Of course, not everything is perfect. IBC transfers are not as immediate as traditional ones, and more attention is required. The user will have to search for the right parameters to enter to start the procedure, making sure with a very small amount that everything is set up correctly. Let’s say that the user experience is improvable and at the moment suitable only for the most experienced and geeky.
In any case, Cosmos’ inter-blockchain communication protocol has received a lot of attention and will probably continue to do so in the future. The support of Keplr adds further value to this excellent crypto wallet.
Keplr wallet: promoted without reservation!
We are very pleased with Keplr, that much had been guessed by now.
What is primarily convincing is the solid and flawless development, as well as the interface. This results in a pleasant user experience suitable for all types of users.
Also pleasing is the lightness in opening and switching between windows. The same applies to the Dashboard, seen for stake and governance functions.
Another strong point lies in completeness: those who use Keplr probably do everything here; they don’t have to go elsewhere.
Cosmos is a powerful network, good perspective but at the same time complex. It therefore needs a tool that suits its characteristics but makes the user’s life a little easier. Keplr wallet fully hits the target.
Do you also use this crypto wallet? Or do you prefer another one? We are all ears on our socials, waiting for you!

