Ledger Nano X: la cassaforte per le tue crypto
Ledger Nano X è un hardware wallet di semplice utilizzo che permette di detenere al suo interno numerose criptovalute proteggendole da possibili attacchi hacker
Indice
- Ledger Nano X: cos'è e come funziona
- Che cos'è un wallet?
- Scegliere la tipologia di Ledger
- Ledger Live: come creare un nuovo Wallet
- Ledger Live: come importare un vecchio wallet
- Schermata Principale Ledger Live
- Portfolio Ledger: visualizzare coin e token
- Accounts: gestisci i tuoi account
- Send e Receive: inviare o ricevere monete
- Buy/Sell crypto: acquistare e vendere asset digitali
- Swap: scambiare monete digitali
- Lend: metti a rendita le tue valute
- Manager: gestisci le tue applicazioni
- Impostazioni Ledger Nano X
- Conclusioni su Ledger Wallet

Ledger Nano X: cos'è e come funziona
Parliamo di hardware wallet, nello specifico di uno dei prodotti più noti e utilizzati: Ledger Nano X.
Quando si parla di crypto, non c’è cosa più importante che tenere le proprie chiavi private al sicuro. In questo senso vengono in aiuto alcuni wallet specifici definiti Cold o Hardware, come appunto Ledger Nano X.
Questi dispositivi fisici ci consentono di firmare le transazioni offline, evitando quindi di esporre le nostre chiavi private. Così facendo, la sicurezza dei nostri asset crypto accresce a dismisura rispetto a un tradizionale wallet online, definito Hot.
La scelta di usare un hardware wallet è perfetta per chi decide di voler holdare tutte o parte delle proprie criptovalute. Al contrario, un trader che opera quotidianamente, magari più volte al giorno, non troverà comodissimo l’utilizzo di un hardware wallet.
Andiamo a scoprire il leader nel settore, Ledger Nano X, partendo storia del brand.
L’azienda è stata fondata nel 2014 da Joel Pobeda, Eric Larchevěque, Nicolas Bacca e Thomas France. Oggi gestisce un mercato da centinaia di milioni di dollari, anche grazie alla qualità costruttiva ed estetica dei propri dispositivi.
A questo punto potremmo chiederci “ma perché un Hardware Wallet ci protegge da eventuali hacker?” La risposta è semplice: vista la presenza di una componente hardware, anche se l’hacker riuscisse a prendere il controllo del nostro computer non avrebbe la possibilità di spostare le criptovalute all’esterno del wallet. Questo perché la conferma finale del trasferimento può essere fatta esclusivamente con il dispositivo fisico. Operando via internet, il malintenzionato non ha modo di prendere il nostro Ledger Nano X, inserirlo nel pc e firmare la transazione.
Scopriamo quindi tutte le funzionalità di questo prodotto: via al tutorial!
Che cos'è un wallet?
Un wallet equivale a un portafoglio dove possiamo inserire le chiavi private delle nostre criptovalute ed esserne gli unici responsabili e proprietari.
Esistono due tipi di wallet: custodial e non custodial.
Il primo non ci dà la proprietà sulle nostre valute, anche se potremo utilizzarle; al contrario, la seconda tipologia non intacca in alcun modo il possesso.
Capire la differenza tra questi due strumenti è fondamentale per avere ben chiari i diritti e i doveri che avremo sulle nostre monete digitali. Perciò, ecco un bell’approfondimento dedicato ai wallet crypto.
Scegliere la tipologia di Ledger
Attualmente esistono quattro tipologie di Ledger in commercio: Ledger Stax, Ledger Nano X, Ledger Flex e Ledger Nano S Plus. Vi è poi anche Ledger Nano S, la vecchia versione del plus. Vediamone somiglianze e differenze.
Il dispositivo più economico è proprio il modello Nano S, in grado di supportare circa 3 applicazioni diverse. Questo dato è sempre stato il suo tallone d’Achille: la memoria troppo ridotta limita parecchio l’operatività e costringe l’utente al continuo susseguirsi di installazioni e disinstallazioni. Non di certo una buona esperienza d’uso.
Al contrario, top di gamma per lungo tempo, Ledger Nano X arriva a memorizzare addirittura 100 applicazioni. Queste ci consentono di supportare diverse blockchain senza pensieri, così da poter risparmiare tempo e noie. Ad esempio, se volessi inserire all’interno del mio Nano S BTC, ETH, DOT, ADA e XLM, beh… non potrei farlo! Dovrei infatti scaricare su Ledger 5 applicazioni diverse, cosa non possibile. Ledger Nano X elimina il problema: sarei in grado di avere queste e tante altre app diverse. Un grande risparmio di tempo.
Da sottolineare che la capacità di memoria riguarda solo ed esclusivamente le applicazioni, non il numero di criptovalute all’interno del wallet. Per capirci, non ci sarà differenza se inseriremo 1 o 100 BTC.
Ledger Nano S Plus rappresenta invece il miglior compromesso tra qualità e prezzo. Di fatto si tratta di un Ledger Nano X, sprovvisto però della batteria e quindi impossibilitato a funzionare senza alimentazione elettrica. Per alcuni non sarà di certo un problema, ma altri lo troveranno un grande limite.
Ledger Flex è l’ultimo arrivato della casa e si piazza nel segmento alto. Schermo e-ink touch, buon compromesso per chi desidera qualcosa in più senza esagerare.
Infine, Ledger Stax è al momento della scrittura la punta di diamante dell’azienda. Prodotto più ingombrante e ricco di funzionalità, richiama l’attenzione con un design moderno e ricercato.
Per scegliere il giusto dispositivo, è bene valutare di quante blockchain diverse abbiamo bisogno per scegliere se optare per Nano X, Nano S, Stax, Flex o Nano S Plus. Il primo è consigliato per chi detiene diversi asset e desideri ampliare il proprio portafoglio su varie coin e token; il secondo è perfetto per chi si limita a due, massimo tre criptovalute e non ha in programma di investire su altro; il terzo è per chi vuole il massimo; il quarto è per le persone esigenti ma attente alla spesa; l’ultimo è un ottimo compromesso qualità-prezzo.

Ledger Live: come creare un nuovo Wallet
Se non possiedi un HW e desideri rimediare, ecco il link allo store ufficiale Ledger, dove potrai acquistare quello che soddisfa le tue esigenze.
Dopodiché, la prima cosa che dobbiamo fare una volta scartato il nostro nuovo Ledger, è andare sul sito ufficiale e scaricare l’applicazione Ledger Live.
Ledger Live rappresenta il wallet ufficiale di Ledger, che ci guida passo passo verso l’inizializzazione del dispositivo.
Dopo aver fatto il download dell’app, l’installazione e aver aperto il software, ecco che ci apparirà una finestra con diverse opzioni tra cui scegliere. L’applicazione è veramente semplice e ci guiderà step-by-step, spiegando esattamente cosa fare per configurare il dispositivo.
Colleghiamo quindi l’hardware wallet al pc. Da qui in avanti, si prosegue l’installazione direttamente dal dispositivo fisico (il Ledger) e non più dall’applicazione sul computer.
Potremo spostarci tra i vari messaggi del sistema tramite i due tasti, presenti sul dispositivo. Per confermare le operazioni ci basterà premerli contemporaneamente. Infine, per accedere al menù principale, dovremo tenerli premuti per qualche secondo.
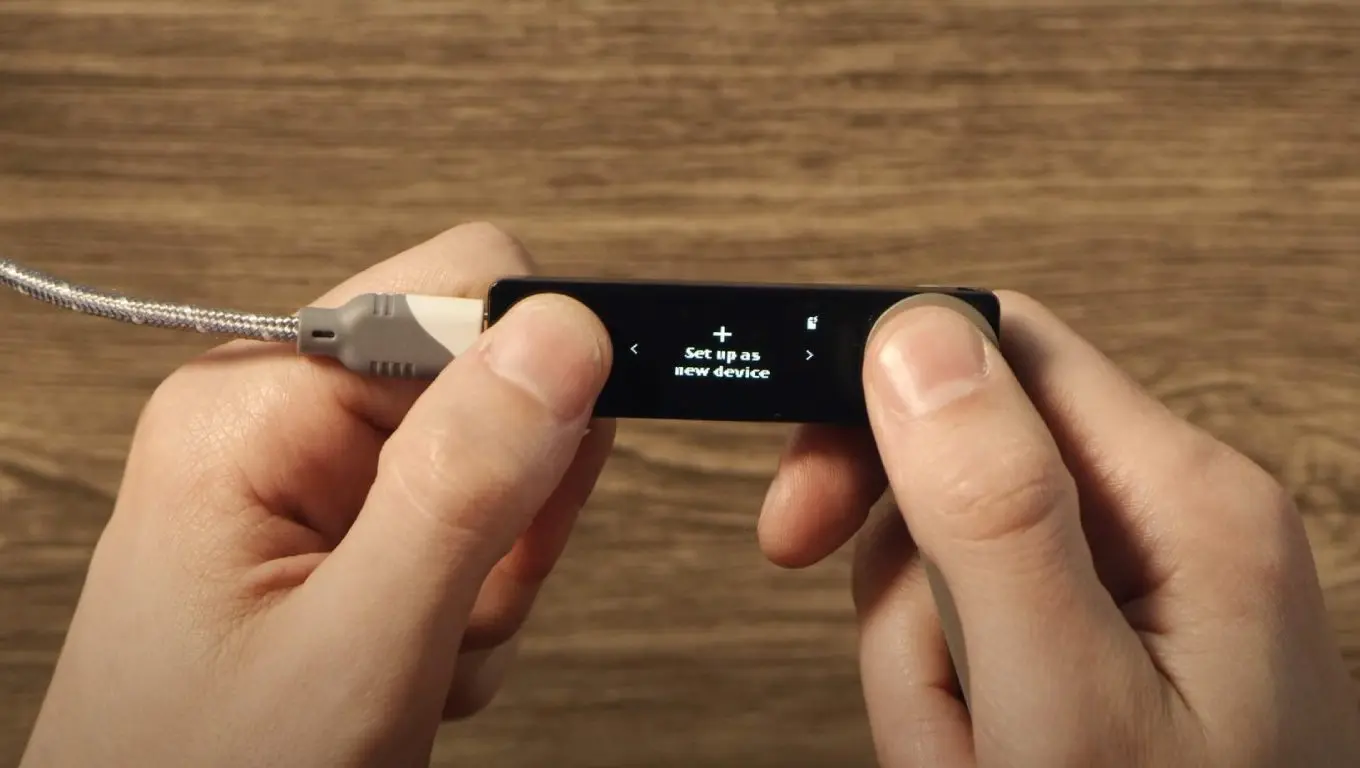
Capito come funziona il dispositivo, scorriamo col tasto destro fino a che non apparirà sul nostro display l’indicazione Set up as new device, con il simbolo del + (vedi immagine qui sotto).
Il dispositivo ci chiederà di scegliere un codice PIN da 4 a 8 cifre. Chiaramente la sequenza dovrà essere memorizzata per poter accedere nuovamente in futuro.
Conclusa questa fase, l’applicazione ci fornirà le 24 parole di recupero (Seed Phrase), indispensabili per recuperare i fondi nel caso perdessimo il Ledger, oppure volessimo importare le chiavi private di questo wallet all’interno di un altro.
Anche in questo caso, ricordati di conservare la Seed Phrase con il più alto livello di sicurezza che tu possa applicare. Se un hacker riuscisse ad entrare in possesso della tua chiave di accesso, nemmeno la presenza del dispositivo fisico potrebbe evitare il furto delle criptovalute contenute all’interno.
Una buona pratica consiste nell’evitare di appuntare la frase su dispositivi informatici, in quanto accessibili da remoto e quindi in balia proprio dei malintenzionati. Carta e penna funzionano bene, purché il foglio sia conservato al sicuro sia dagli estranei che dagli elementi.
Dopo aver trascritto la frase, procedendo oltre il dispositivo vi chiederà di reinserirla per conferma.
Fatto anche questo passaggio, la fase di inizializzazione è finalmente compiuta. Possiamo accedere alla applicazione del dispositivo che, nel frattempo, avrà terminato il processo di installazione.
La prima schermata che visualizzeremo sarà quella di conferma e controllo dell’autenticità del dispositivo. Per procedere non dovremo fare altro che cliccare da app sul tasto blu Check now e poi confermare attraverso l’hardware. Se il dispositivo è autentico, vedremo la scritta Your device is genuine.
Giunti a questo punto potremo impostare una password per l’applicazione. Così facendo avremo sia un PIN che protegge il dispositivo fisico che una password a tutela dell’applicazione.
Confermiamo anche i dati e le impostazioni di privacy e potremo finalmente accedere alla Home del dispositivo.
Ledger Live: come importare un vecchio wallet
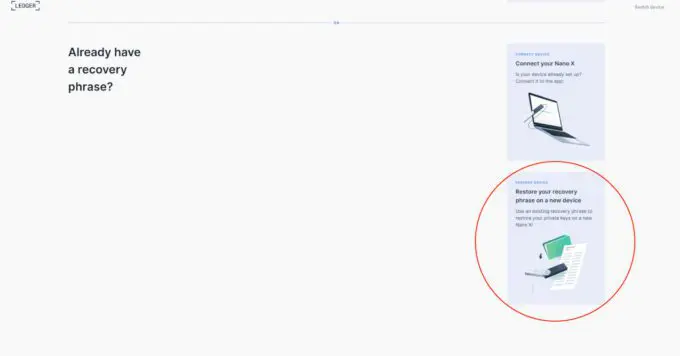
Se volessimo importare un wallet già esistente all’interno del nostro nuovo Ledger Nano X, ci basterà accedere all’applicazione Ledger Live e scegliere Restore your recovery phrase on a new device (evidenziato nell’immagine).
Ovviamente, come conferma dovremo inserire all’interno dell’applicazione la Seed Phrase del wallet per importare le sue chiavi private nel Ledger Nano X.
Schermata Principale Ledger Live
Nella schermata principale di Ledger Live possiamo riconoscere fin da subito il design innovativo e minimale dell’applicazione. Da qui sarà possibile muoverci verso le varie funzioni dell’applicazione che elenchiamo brevemente:
- Portfolio (Home): possiamo vedere i balance all’interno del nostro dispositivo, le applicazioni supportate e anche uno storico delle transazioni. Da qui è possibile anche aggiornare il nostro dispositivo, aspetto fondamentale per garantirne la sicurezza.
- Accounts: in questa finestra è possibile accedere a ciascun account, visualizzare i rendimenti delle nostre coin dal giorno in cui sono state versate nel nostro account a oggi, oppure consultare le varie transazioni effettuate su ogni singola coin.
- Send: funzione che ci permette di inviare criptovalute.
- Receive: funzione che ci consente di ricevere criptovalute.
- Buy/Sell: possibilità di comprare criptovalute con FIAT money attraverso i partner e di vendere mediante l’applicazione integrata exchange.
- Swap: possibilità di scambiare le nostre coin tramite l’applicazione.
- Lend: possibilità di mettere a rendita alcune delle nostre criptovalute sfruttando la piattaforma di DeFi Compound.
- Manager: qui possiamo vedere tutte le applicazioni installate e non sul nostro dispositivo e anche la capacità di memoria disponibile.
Portfolio Ledger: visualizzare coin e token
Schermata classica e simile in quasi tutti i wallet che ci permette di vedere il saldo totale e il rendimento degli asset. In più, da qui si può aggiornare il Ledger Nano X.
Vale la pena soffermarsi ancora una volta sull’importanza che ha l’update di un hardware wallet. La procedura è infatti fondamentale per garantirne il corretto funzionamento e, di conseguenza, la sicurezza.
Data la possibilità di subire attacchi hacker attraverso la casella di posta elettronica (phishing), consigliamo di aggiornare il dispositivo sempre e solo attraverso l’applicazione e solo quando compare la notifica di segnalazione.

Per avviare l’aggiornamento vi basterà cliccare sul tasto Download Update.
Scorrendo verso il basso potrete vedere le allocazioni dei vostri asset e le operazioni svolte in passato, avendo anche la possibilità di analizzarle attraverso un explorer.
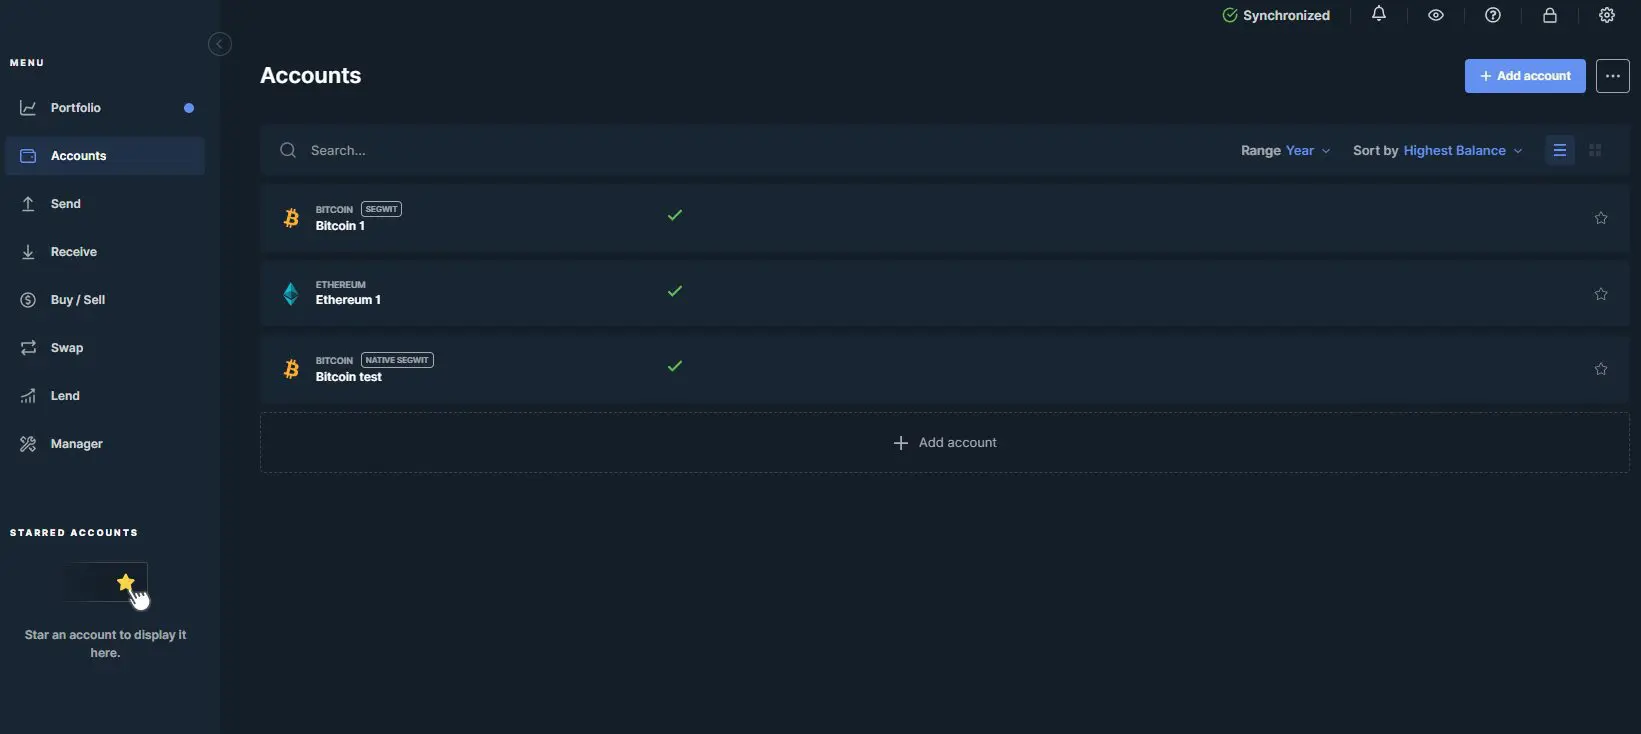
Accounts: gestisci i tuoi account
In questa finestra è possibile accedere a ogni account all’interno del nostro Ledger Nano X; potremo quindi gestire ogni singola coin in maniera differente.
Abbiamo anche la possibilità di aggiungere un account diverso da quelli che abbiamo già registrato.
Infatti, un account non è altro che l’address in cui vogliamo depositare le nostre criptovalute. Ledger Live ci consente di creare numerosi account diversi anche per la stessa coin, così da poter dividere le valute al suo interno come più ci piace. Il tutto senza dover necessariamente scaricare più applicazioni.
Ad esempio, qua sotto puoi vedere l’immagine di un address Ledger Live dotato di più account Bitcoin.
Send e Receive: inviare o ricevere monete
Attraverso le funzioni di Send e Receive possiamo rispettivamente inviare o ricevere criptovalute da/a questo dispositivo.
La procedura è abbastanza semplice, vediamone i passi principali:
Per inviare crypto:
- Cliccare sul tasto Send.
- Selezionare la tipologia di token o coin crypto.
- Copiare l’address a cui vogliamo inviare le monete. Ricordiamo di scegliere il network corretto e di inviare le criptovalute a un address compatibile; in caso contrario potremmo perdere la somma coinvolta.
- Selezionare la quantità di token da inviare.
- Confermare con il Ledger Nano X (doppio click sulla conferma visualizzabile sul dispositivo stesso).
Per ricevere crypto:
- Cliccare sul tasto Receive.
- Selezionare la tipologia di token o coin.
- Confermare col dispositivo (doppio click sulla conferma visualizzabile sul dispositivo hardware).
- Copiare l’indirizzo fornito e farlo avere a chi dovrà inviarci la criptovaluta in questione.
"Inviare e ricevere crypto con Ledger Nano X: tutto molto semplice, intuitivo e sicuro"
Buy/Sell crypto: acquistare e vendere asset digitali
Attraverso questa funzione di Ledger Live potremo acquistare e vendere criptovalute con valute FIAT.
Farlo sarà abbastanza semplice: ci basterà cliccare sul tasto Buy/Sell crypto sempre all’interno dell’applicazione Ledger Live per accedere a una finestra dedicata. Qui ci verrà subito chiesto come intendiamo procedere: vendita o acquisto? Ipotizzando un acquisto, ecco ciò che visualizzeremo:
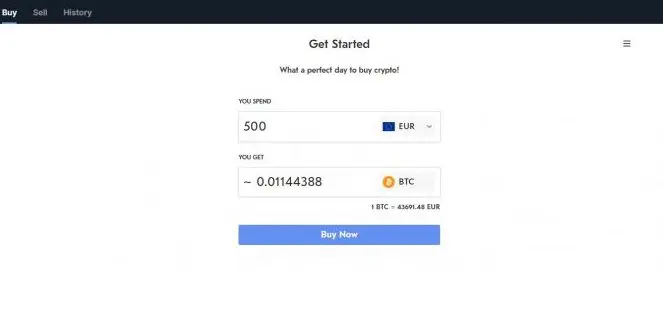
Non dovremo fare altro che indicare quanto acquistare, accedere attraverso il nostro account Ledger e inserire le coordinate bancarie, così da poter procedere al pagamento. Tutto qui.
Per quanto questo metodo sia estremamente sicuro rispetto al classico acquisto/vendita e spostamento attraverso l’exchange, si tratta di un servizio molto costoso in termini di fee. Perciò, se possiamo scegliere un metodo più economico, perché non farlo?
Un piccolo trucco per risparmiare sulle fees nel passaggio da/verso Ledger Nano X sta nell’utilizzare il Withdraw gratuito (prelievo) offerto dalle piattaforme di lending e dagli exchange.
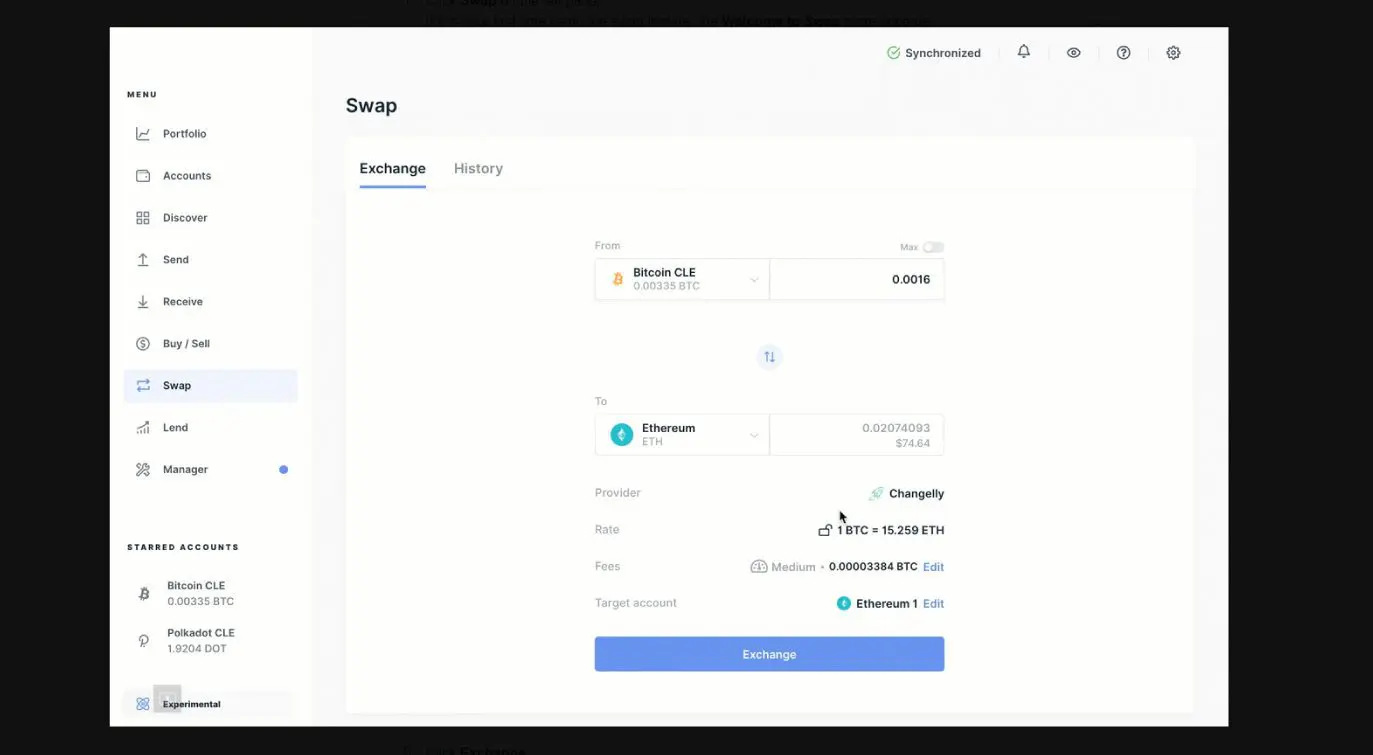
Swap: scambiare monete digitali
Attraverso la funzione Swap di Ledger Live sarà possibile interagire attraverso l’estensione dell’applicazione “Exchange” per collegarci al servizio che ci permetterà di scambiare le nostre criptovalute, chiaramente pagando una fees (network fee + exchange fee).
Anche in questo caso, tutto è molto semplice e immediato, soprattutto se avete si ha già esperienza degli swap in altre applicazioni.
Come puoi notarere, sarà sufficiente inserire a sinistra il token che vogliamo scambiare e a destra ciò che vogliamo ricevere.
L’unico cambiamento che noto rispetto ad altre tipologie di swap è la possibilità di decidere se vogliamo un cambio con Floating Rate oppure Fixed Rate:
- Floating Rate: il cambio tra le due valute varia in funzione delle attuali condizioni del mercato e varia ogni secondo.
- Fixed Rate: il cambio tra le due valute rimane costante per 30 secondi, dopodiché sarà necessario aggiornarlo.
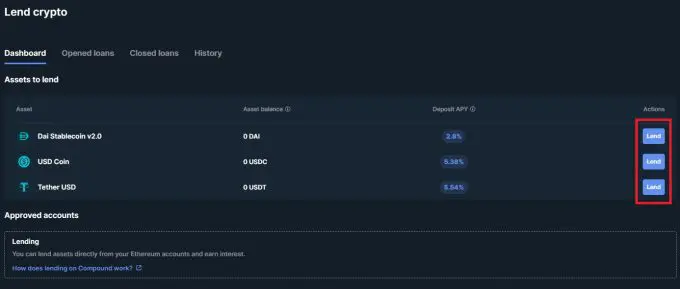
Lend: metti a rendita le tue valute
Tramite la funzione Lend possiamo mettere a rendita le nostre monete mediante l’uso di Compound, una delle più famose piattaforme di Lending e Borrowing esistenti. Per fare ciò dovremo scaricare l’estensione del Ledger ” Exchange“, nulla di più.
Oltre alla possibilità di mettere a rendita DAI/USDC/USDT, sarà possibile utilizzare parte delle nostre valute per creare un collaterale e aprire un prestito. Per approfondire il funzionamento delle piattaforme di questo mondo, ecco un articolo dedicato alla finanza decentralizzata (DeFi).
Scendiamo adesso ai dettagli per capire come poter fare ciascuna delle due cose.
Per mettere a rendita le nostre monete ci basterà cliccare sul tasto Lend (rettangolo rosso) all’interno dell’ applicazione; dopodiché pigiamo su un ulteriore pulsante Lend accanto a ciascuna delle stablecoin sopra indicate. Seguiamo le indicazioni e confermiamo.
Invece, per aprire un prestito è indispensabile aver depositato le coin disponibili al servizio, ovvero DAI/USDC/USDT. Queste fungeranno da collaterale e ci consentiranno di procedere. Questo prestito avrà ovviamente un interesse da pagare annualmente e la possibilità di essere chiuso prima del tempo.
Andiamo nella sottosezione Opened Loans e scegliamo l’asset da prendere in prestito.
Quando desidereremo riprendere il collaterale e chiudere la pratica, rechiamoci nella sottosezione Closed Loans. Una volta lì, depositiamo nel Ledger la somma di monete prese in prestito sommata all’interesse richiesto dalla piattaforma. In cambio riprenderemo possesso del collaterale fornito in precedenza.
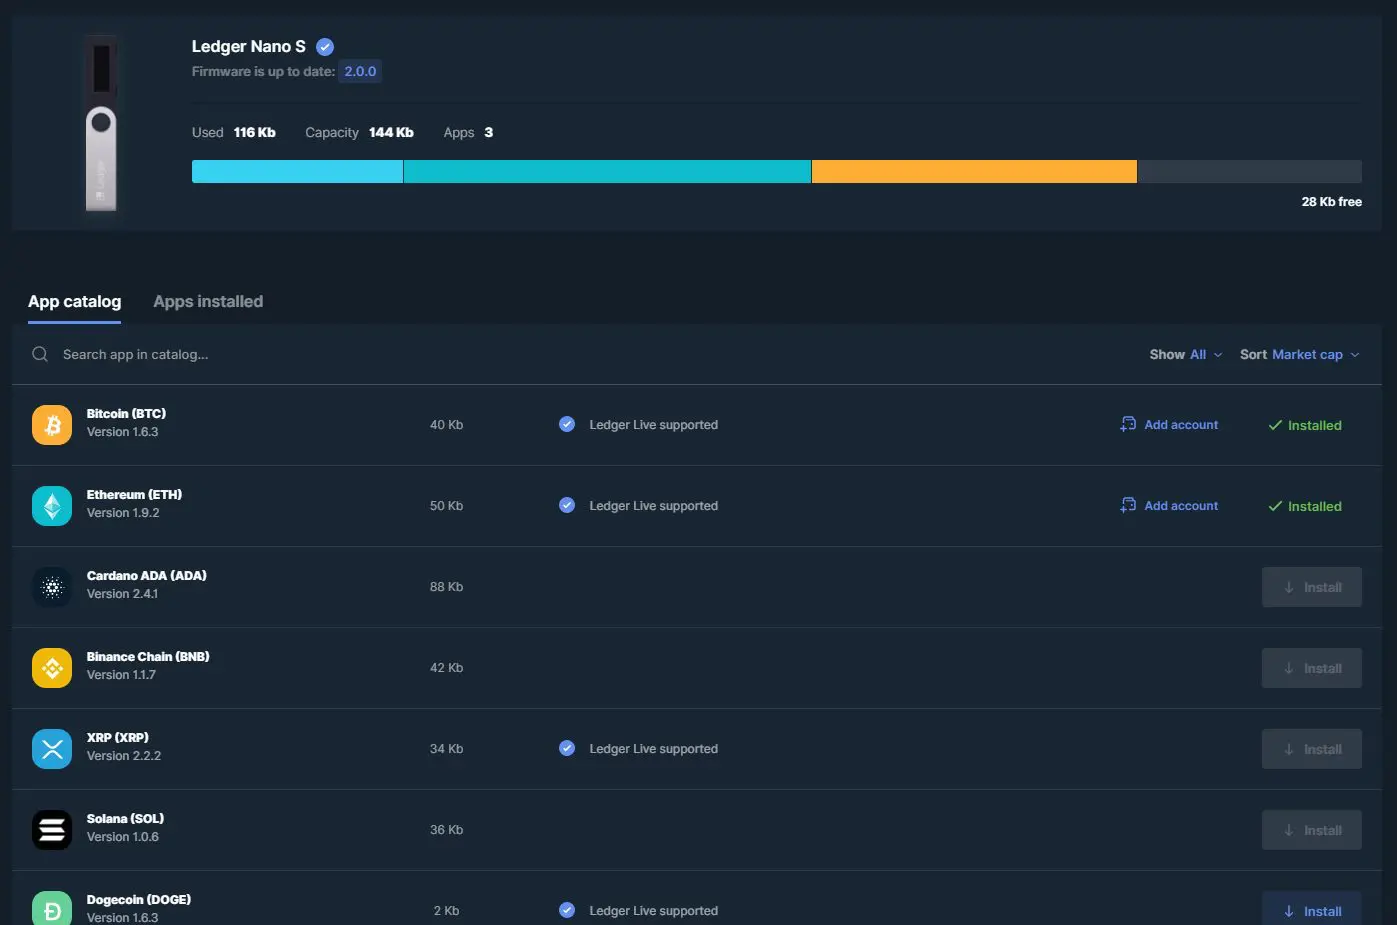
Manager: gestisci le tue applicazioni
In questa parte dell’applicazione possiamo gestire la memoria del Ledger Nano X installando o disinstallando le varie applicazioni.
Inoltre, attraverso questa finestra saremo in grado di scaricare le applicazioni (come per esempio Exchange) che danno la possibilità di sbloccare nuove funzioni.
Ricorda: per disinstallare le applicazioni Ledger ti basterà cliccare sulla sotto categoria Apps Installed, pigiando poi sull’icona del cestino a destra di ciascuna app.
Impostazioni Ledger Nano X
Per accedere alle Impostazioni Ledger, clicchiamo sulla classica icona dell’ingranaggio in alto a destra nell’applicazione Ledger Live.
Una volta all’interno, ecco le diverse opzioni:
- General: possibilità di personalizzare la home.
- Accounts: da qui è possibile esportare l’account, salvare la cronologia di azioni svolte e modificare il numero di conferme di cui ha necessità il Ledger per compiere un’azione.
- Version: dedicata alla versione del Ledger Nano X e i termini e condizioni accettati.
- Help: in questa finestra troviamo le specifiche e le informazioni per ricevere supporto da parte dell’applicazione. È disponibile anche un link che rimanda alla pagina del support Ledger.
- Experimental Features: da qui si attivano funzionalità innovative e non ancora testate al 100%. Tra queste vediamo la possibilità di connettere un full node di Bitcoin, tradurre le scritte dell’applicazione nella propria lingua e molto altro ancora.

Conclusioni su Ledger Wallet
Come già detto in precedenza, Ledger Live è una delle applicazioni più usate dalle persone che investono in criptovalute. Ne consegue un funzionamento dell’applicazione impeccabile.
Una buona applicazione non sarebbe però sufficiente: serve anche un dispositivo all’altezza del compito. Ledger Nano X risponde presente grazie all’elevata intuitività e all’ottimo rapporto qualità/prezzo.
Ledger Nano X è un dispositivo molto comodo anche in termini di tascabilità: lo si può portare dovunque (mai con la seed phrase, mi raccomando).
Durante l’utilizzo non abbiamo avuto problemi né necessità di contattare l’assistenza. Questo hardware wallet fa certamente per te se desideri proteggere i tuoi asset digitali senza dover spendere una fortuna.
Vuoi altre informazioni per capire meglio come funzionano questi software e device? La nostra sezione dedicata ai wallet crypto è il luogo perfetto. Scopri la principale alternativa ai dispositivi Ledger: Trezor. Il grande vantaggio di questo brand è di essere open-source, cosa invece non prevista per i device Ledger e che ha suscitato non poche critiche nel tempo.
Chiudiamo in bellezza con un video che mostra tutto ciò che ti serve sapere su Ledger Nano X, dall’unboxing alle funzionalità esplorate in questo articolo. Buona visione!