MetaMask: la guida completa in italiano per usarlo nel 2026
MetaMask è il wallet crypto più usato al mondo: scopri come crearlo, configurarlo, collegarlo alle DApp e usarlo in sicurezza. Guida in italiano 2026.
Indice
- Come funziona MetaMask: architettura e blockchain supportate
- Come creare un wallet MetaMask: guida passo passo
- Come connettere MetaMask a una DApp
- Come fare swap su MetaMask
- Come aggiungere e cambiare network su MetaMask
- Come trasferire da Binance a MetaMask
- MetaMask è sicuro? Rischi e best practice 2026
- Come dichiarare MetaMask nella dichiarazione dei redditi
- Conclusioni su Metamask Wallet
MetaMask è il wallet crypto non-custodial più diffuso al mondo, disponibile come estensione browser e app mobile, che permette di conservare criptovalute, interagire con le DApp e accedere al Web3 senza intermediari.
Si tratta di uno dei wallet più utilizzati nel settore, grazie alla sua semplicità d’uso e all’integrazione con gran parte delle applicazioni DeFi. MetaMask viene installato come estensione per browser come Chrome, Brave o Firefox, ma è disponibile anche in versione mobile per smartphone.
Lanciato nel 2016, il wallet nasce come strumento per interagire con la rete Ethereum, ma nel tempo ha esteso il supporto a diverse blockchain compatibili, come BNB Smart Chain, Polygon e altre reti EVM.
Recentemente ha integrato il supporto anche per Bitcoin e Solana, espandendosi oltre l’ecosistema Ethereum supportando la prima e la quinta blockchain più grandi sul mercato.
| Caratteristica | Dettaglio |
| Sviluppatore | ConsenSys (2016) |
| Tipo wallet | Non-custodial, software |
| Disponibile su | Chrome, Firefox, Brave, iOS, Android |
| Network supportati | Ethereum, BNB Chain, Polygon, Avalanche, Arbitrum, Optimism + custom |
| Token supportati | ERC-20, BEP-20, ERC-721 (NFT) |
| Costo | Gratuito (fee di rete a carico utente) |
| KYC richiesto | No |
| Open source | Sì |
| Sicurezza | Seed phrase 12 parole, nessun custode centrale |
Come funziona MetaMask: architettura e blockchain supportate
MetaMask è uno dei più famosi wallet crypto non custodial che ci permette di interagire con le DApp.
Esso viene installato come estensione o plugin del browser web ed è compatibile con i più utilizzati; l’abbinamento MetaMask Chrome è solitamente quello maggiormente impiegato.
Esiste inoltre una versione per smartphone: ne abbiamo parlato in questo articolo dedicato a MetaMask Mobile.
Il portafoglio digitale rappresentato dalla volpe rossa è stato fondato nel 2016 dalla società Consensys, coinvolta direttamente nello sviluppo del network Ethereum. Dopo dieci anni sul mercato, Metamask vanta oggi oltre 30 milioni di utenti attivi mensili.
Tra le sue caratteristiche principali c’è quella di inter-operare con diversi network, primo fra tutti Ethereum, rete nativa di questo wallet; si aggiungono poi molte altre reti come la BNB Smart Chain e Polygon, nonché tutte le blockchain EVM (Ethereum Virtual Machine) compatibili.
Nel 2025 è stato introdotto anche il supporto per il network di Solana, espandendo così la sua base di utenza anche fuori dall’ecosistema EVM. Nel 2026, inoltre, il supporto si è espanso anche a Bitcoin, coinvolgendo così il più grande network del settore.
MetaMask è sicuro, intuitivo, rapido e soprattutto presente in gran parte delle piattaforme DeFi create fino ad oggi. Non c’è niente di meglio per un Hot Wallet che essere utilizzabile ovunque.
Dopo le presentazioni, andiamo a scoprire come funziona MetaMask e quali sono le funzionalità proposte.
Ma quindi, a cosa serve Metamask?
Per rispondere alla domanda dobbiamo comprendere che cos’è un wallet per criptovalute.
Un wallet equivale ad un portafoglio dove possiamo custodire le nostre criptovalute ed esserne gli unici responsabili e proprietari.
Esistono due tipi di wallet: custodial e non custodial. Con il primo deleghiamo la proprietà sulle nostre valute all’exchange, anche se ovviamente potremo utilizzarle. Invece, tramite il secondo conserveremo la proprietà delle nostre crypto, nonché la responsabilità delle chiavi private del wallet stesso.
Capire la diversità tra questi due wallet è fondamentale per avere ben chiaro i diritti e i doveri che avremo sulle nostre monete digitali.
Non ci resta quindi che iniziare il nostro MetaMask tutorial.
Come creare un wallet MetaMask: guida passo passo
Per creare un nuovo wallet MetaMask sarà necessario, per prima cosa, scaricare l’estensione per il nostro browser dal suo sito ufficiale Metamask.
Come dicevamo in precedenza, la coppia preferita dagli utenti è quella MetaMask Chrome (o Brave). Questo tuttavia non è l’unico browser supportato: è disponibile anche Metamask per Firefox. Non è invece supportato Safari, il browser nativo dei device Apple.
Una volta aperta l’applicazione ci verrà chiesto di inserire una password complessa. Ovviamente, il consiglio sarà banale, suggeriamo di utilizzare una password diversa per ogni wallet che andremo a creare tramite diverse applicazioni.
Fatto ciò, appariranno le 12 parole che compongono la Seed Phrase: esse sono quelle che utilizzeremo per poter importare il nostro wallet MetaMask su altri dispositivi, oppure per ripristinarlo in caso di perdita dell’account.
La seed phrase deve essere conservata al sicuro da possibili attacchi hacker, perdita accidentale, furto o altro. Inoltre, essa va trascritta nell’ordine in cui ci viene fornita, altrimenti sarebbe come inserire la password errata e non riusciremmo ad accedere al wallet.
Ricordiamo che lo smarrimento della frase equivale a perdere il proprio wallet e le criptovalute in esso detenute.
Una volta scritta la seed phrase, l’applicazione ci chiederà nuovamente di inserire in ordine le parole, così da confermare la memorizzazione di queste ultime.
Confermando, accederemo finalmente al nostro wallet e saremo all’interno della sua applicazione.
Ricorda bene: con la password potremo fare il login su Metamask, ma se ad esempio elimineremo l’estensione, quest’ultima non basterà a recuperare i fondi, per quello serve la seed phrase.
Come importare un vecchio wallet MetaMask
Per importare un MetaMask Wallet già esistente ci basterà cliccare sul simbolo di MetaMask a destra dell’URL sul nostro browser; dopodiché selezioneremo la scritta blu sotto la password Import Using Secret Recovery Phrase.
Giunti alla pagina di ripristino dovremo inserire nella prima riga sotto la frase Wallet Secret Recovery Phrase le nostre 12 parole della Seed Phrase.
Dopodiché procederemo a reimpostare una password per poter accedere di nuovo al nostro account e (finalmente!) rientrare in possesso delle nostre chiavi private.
Nell’immagine, potete vedere ciò che visualizzerete una volta che avrete cliccato Import Using Secret Recovery Phrase.

Schermata principale MetaMask
Nella schermata principale di MetaMask possiamo vedere diverse funzionalità a cui abbiamo accesso, aiutandoci con uno screenshot che trovate in fondo a questo paragrafo, cerchiamo di fare chiarezza sulla Home di questo wallet, comunque molto semplice e intuitivo.
Al centro, posizionato in alto, possiamo visualizzare chiaramente con quale network siamo connessi. In funzione della DApp che stiamo utilizzando, dovremo compiere uno Switch (cambio) di rete.
L’icona in alto a destra rappresenta il nostro account. La sua immagine è unica, poiché generata grazie all’utilizzo di chiave privata. Cliccandoci sopra potremo accedere a diverse funzionalità, tra cui: generare o importare altri account, connettere il proprio hardware wallet, contattare il support e accedere alle Impostazioni che vedremo nel dettaglio dopo.
Dove leggiamo “Account” possiamo copiare l’address del nostro account, da utilizzare per inviare o farci inviare criptovalute all’interno del wallet.
Cliccando i tre puntini verticali accanto potremmo accedere ad un menu per:
- Espandere la vista del wallet a schermo intero
- Visitare i dettagli dell’account, esportare la nostra chiave privata
- Visualizzare il wallet attraverso il sito Etherscan e da qui poter controllare le transazioni
- Visualizzare le DApp collegate con questo account
Infine, appena sotto, visualizziamo il corpo del wallet, all’interno dei quale possiamo vedere il saldo totale.
Dal wallet è possibile inviare, comprare e scambiare criptovalute e, scorrendo leggermente verso il basso, aggiungere altre coin.
Capita spesso che se inviamo delle valute esotiche (di basso rank) MetaMask non le riconosca e quindi dovranno essere aggiunte manualmente per poterle vedere all’interno del nostro wallet.
In questa schermata è anche possibile visualizzare le attività svolte recentemente per avere una sorta di cronologia delle ultime transazioni.
Come usare MetaMask da telefono
Lo smartphone è sempre in tasca; ecco perché c’è chi vorrebbe poter accedere al proprio wallet direttamente da questo dispositivo.
Come dicevamo in precedenza, gli sviluppatori di MetaMask hanno pensato anche a questo, creando un’applicazione mobile Android e iOS.
Seppur cambia il supporto, il popolare wallet mantiene pressoché inalterata l’esperienza d’uso. L’utente si sente subito “a casa” e non incontra particolari difficoltà.
Se vuoi approfondire, abbiamo dedicato un tutorial proprio a MetaMask Mobile.
Come connettere MetaMask a una DApp
Come abbiamo detto, MetaMask è il wallet perfetto per poterci connettere alle DApp. Questo perché si tratta di un’operazione estremamente semplice: per farlo dovremo solo accedere alla piattaforma web e cliccare la scritta Connect Wallet presente quasi sempre in alto a destra.
L’applicazione ci chiederà con quale wallet desideriamo connetterci e potremo scegliere tra quelli supportati.
Nel nostro caso, ovviamente selezioneremo MetaMask, per poi connetterci mediante l’immissione della nostra password. Una volta fatto ciò saremmo collegati alla piattaforma; Sarà come entrare all’interno di un negozio con il vostro portafoglio a portata di mano.
Alcune Dapp ci richiederanno una verifica tramite firma per verificare la connessione. Sebbene questa connessione non crei una diretta vulnerabilità, è importante verificare quali messaggi andiamo a firmare. Diffida dal firmare messaggi che non riesci a comprendere su piattaforme non così solide.
Come precauzione che ci teniamo a condividere, una volta che abbiamo effettuato le interazioni con una Dapp, possiamo disconnetterci. Per farlo, basterà cliccare sul logo dell’applicazione che vedremo in alto a destra nel nostro wallet, selezionare “Manage permission” ed effettuare la disconnessione.
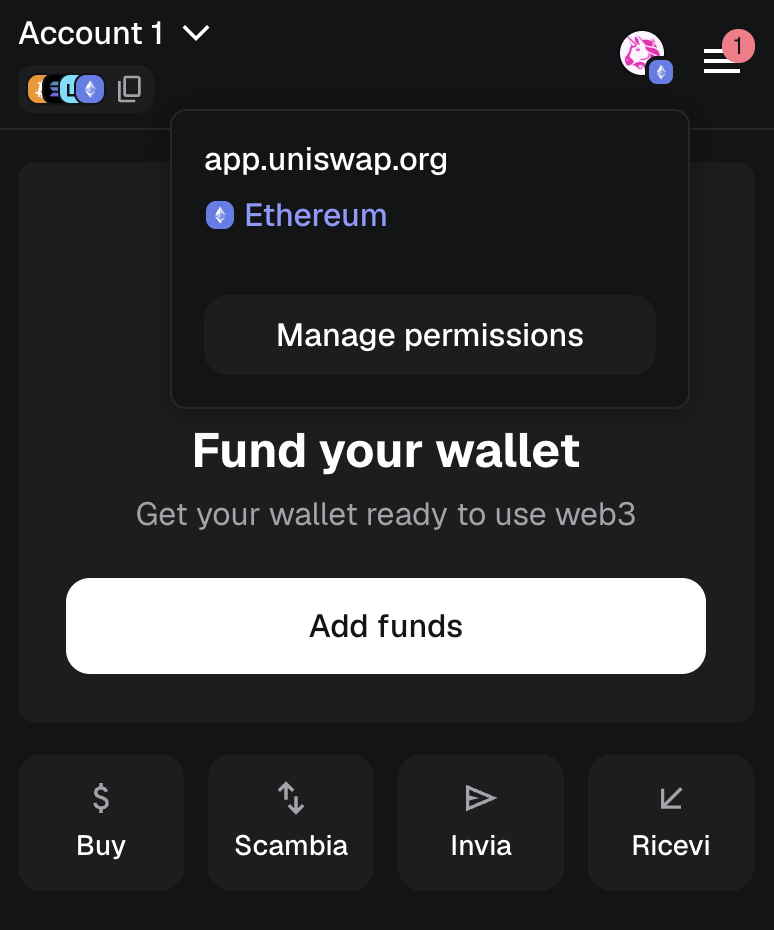
Quando interagiamo con una dapp, eventuali transazioni o approvazioni di smart contract passeranno sempre attraverso il vostro wallet e, se sarà necessario pagare, potremo utilizzare parte delle coin custodite in esso.
Ricordiamoci che all’interno di una DApp pagheremo quasi sempre con la coin nativa del network su cui la piattaforma è creata.
Ad esempio, se connettessimo MetaMask ad Uniswap, la più famosa piattaforma DEX costruita sopra il network Ethereum (ma non solo), pagheremmo le fees per il suo utilizzo in ETH; questo perché il network a cui è connesso il wallet sarà Ethereum.
In questo caso possiamo vedere Ether come il gas necessario per far lavorare l’applicazione costruita sopra la sua rete. Ricordiamoci che non possiamo svolgere nessun tipo di azione se non abbiamo il gas richiesto per pagare le commissioni.
Come collegare MetaMask a OpenSea
Dato che molti utenti lo chiedono, scopriamo rapidamente come collegare MetaMask a OpenSea.
Nulla cambia rispetto a quanto detto poche righe sopra. Su Opensea.io, clicchiamo sull’icona del portafoglio, sita in alto a destra dello schermo. Selezioniamo MetaMask, colleghiamoci e il gioco sarà fatto!
Per approfondire la piattaforma, ecco il tutorial OpenSea.
Come fare swap su MetaMask
Tramite MetaMask è possibile swappare i nostri token senza dover passare direttamente da una piattaforma di DeFi.
Ciò è possibile utilizzando la funzione integrata Scambio all’interno del portafoglio digitale; essa controlla in brevissimo tempo tutte le piattaforme di DeFi integrate e ricerca automaticamente il prezzo migliore per eseguire lo scambio.
Unica nota dolente: MetaMask fa pagare un tasso di cambio decisamente alto per ogni scambio, che si aggiunge alle fee del network.
Per compiere questa azione ci basterà cliccare sul tasto Scambia all’interno della Home del wallet e selezionare ed inserire la quantità e la tipologia di token da scambiare.
In basso potrete modificare la percentuale di slippage, cioè la massima variazione di prezzo che i token potranno avere durante l’arco dello scambio. Questa opzione è molto importante: l’utente tende a voler scambiare i token in questione al prezzo attuale, impostando uno slippage basso.
Per trovare uno scambio realmente possibile, l’applicazione imposterà invece uno slippage maggiore. Spetterà a noi utenti cercare la giusta via di mezzo per compiere lo scambio con i valori più simili al prezzo che ci eravamo prefissati.
Una volta scelta anche questa impostazione, MetaMask valuterà attraverso le numerose piattaforme di DeFi quale sarà lo scambio più favorevole e ci darà una preview dei valori di scambio e dei costi delle fees.
Per dovere di informazione, è giusto sottolineare che lo scambio attraverso MetaMask non è consigliato. In passato, l’applicazione diede gravi problemi ad alcuni utenti, facendoli arrivare a perdere i proprii LP token durante lo swap con una singola moneta, come BNB.
Come aggiungere e cambiare network su MetaMask
A seconda di quale DApp stiamo collegando il nostro wallet, dovremo scegliere il network più adatto per l’operazione che andremo ad eseguire.
A tal proposito, esistono due tipi di DApp: quelle mono-network e quelle poli-network.
Le prime sono le più semplici e quando connetteremo il nostro wallet al loro interno ci chiederanno di scegliere la rete che supportano. Non funzioneranno finche staremo usando un altro network.
Quanto alle poli-network, invece, supportano più reti e di conseguenza spetterà a noi utenti capire su quale vogliamo effettivamente operare. MetaMask fa parte di questo gruppo.
Per capire bene il concetto, ricorriamo ad un esempio per contestualizzare il tutto: vogliamo connettere MetaMask a SushiSwap, una delle piattaforme DEX con maggiori volumi nel mercato, anche grazie alla possibilità che offre di connettersi a 14 network diversi.
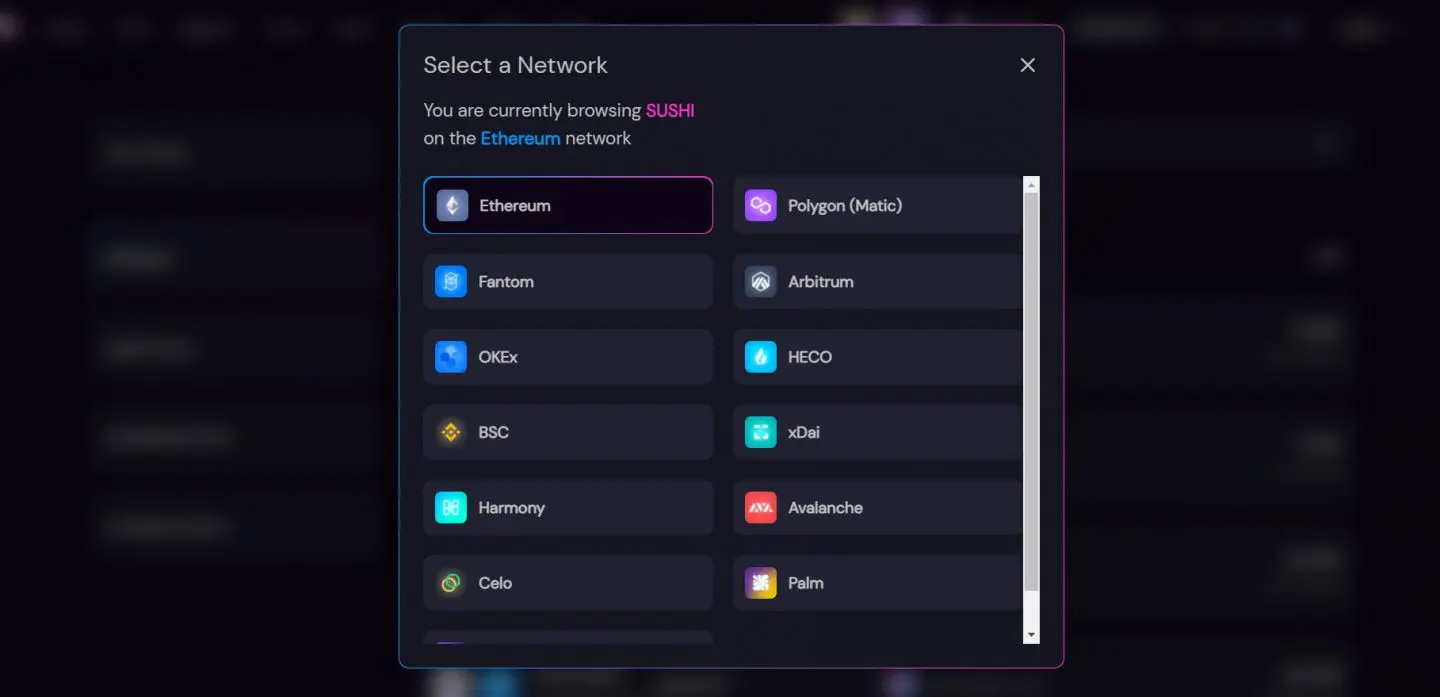
Come scelgo il network? Cosa cambia tra un network ed un altro?
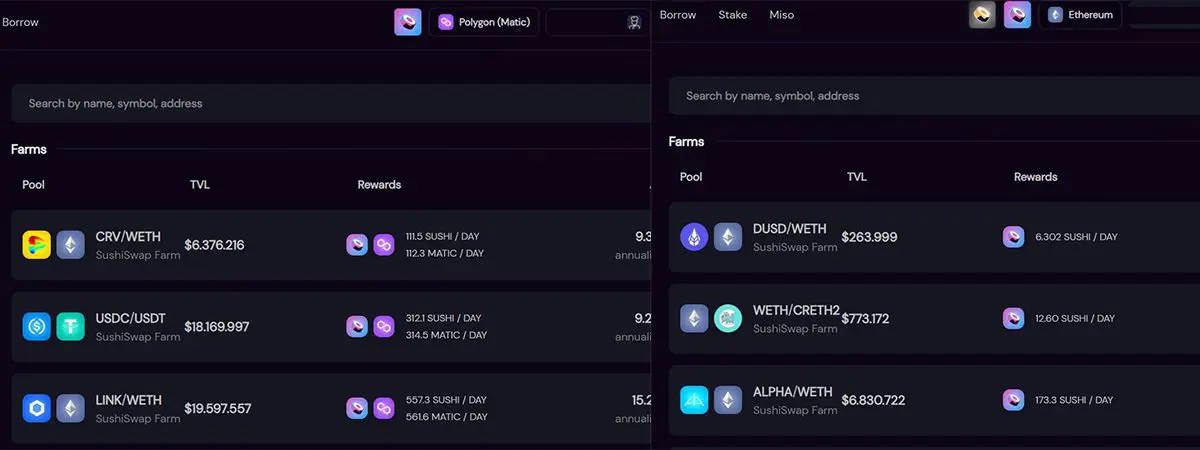
- Le funzioni utilizzabili all’ interno della piattaforma: utilizzando la rete Ethereum potremo accedere allo staking del token Sushi, cosa non possibile sulle altre reti.
- Il network, e quindi la macchina virtuale che supporta l’applicazione: ogni azione compiuta all’ interno dell’applicazione che ha a che fare con un trasferimento di valute o la conferma di uno smart contract comporterà una spesa nella coin nativa della rete che state utilizzando (ETH sulla rete Ethereum / BNB sulla rete BNB Smart Chain ecc..).
- I pool o i vari stake delle valute all’interno alla piattaforma di DeFi: ad esempio, dentro Sushiswap su rete Ethereum, sarà possibile trovare lo scambio di token standard ERC-20, mentre quando sarà connesso attraverso la Binance Smart Chain, potranno avvenire solo scambi su standard BSC.
Per cambiare network basterà cliccare sull’icona vista precedentemente e, subito dopo aver selezionato la rete, apparirà una conferma su MetaMask che vi permetterà di completare l’operazione.
Come aggiungere BSC a MetaMask
Con i recenti aggiornamenti, tutte le principali blockchain sono automaticamente supportate all’interno di Metamask.
In base all’utilizzo, potrebbe tuttavia essere necessario aggiungere il supporto per determinate reti. Prendiamo in esempio il caso di voler aggiungere BSC a Metamask.
Sarà necessario andare nella tendina in alto a destra delle impostazioni fino a raggiungere la voce “reti”. A quel punto, l’interfaccia ci mostrerà tutte le reti supportate ed una voce “+ add a custom network”.
Qui ci troveremo a dover aggiungere 5 dati, quali:
- Nome Network
- Default RPC URL
- Chain ID
- Simbolo moneta
- URL block explorer
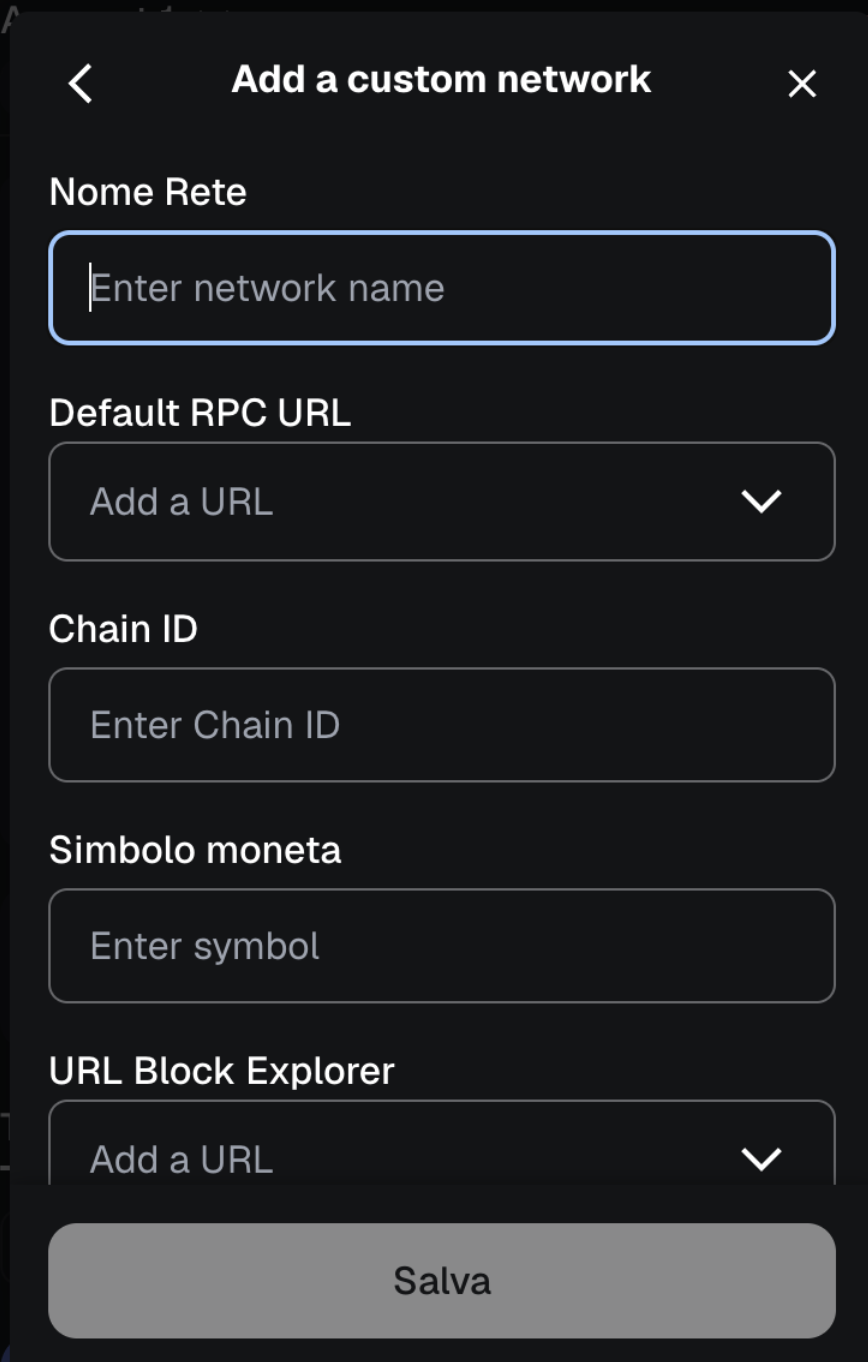
In genere questi dati vengono resi disponibili sui siti ufficiali della blockchain di riferimento. Consulta sempre i siti ufficiali.
Per praticità, invece, condividiamo anche un metodo più semplice ed intuitivo. Recandoci sul sito Chainlist.org, infatti, possiamo connettere il nostro wallet e selezionare tutti i network supportati, come in questo caso BSC. Non ci resterà quindi, una volta selezionato il network, che cliccare su “add to Metamask”. Detto, fatto, ora il nostro network preferito sarà presente all’interno del nostro wallet.
Come importare un token su Metamask
Proseguiamo a scoprire come funziona MetaMask dando un’occhiata all’importazione di nuovi token
Salvo le principali coin, nel caso acquistassimo o ricevessimo una valuta per la prima volta potremmo inizialmente spaventarci: non riusciremmo a visualizzarla nel wallet.
Nessun problema: è tutto lì, solo che non possiamo ancora vederlo. Questo perché Metamask non importa in automatico i nuovi token ma siamo noi a doverli aggiungere all’elenco. Vediamo come procedere!

Innanzitutto, selezioniamo il network corretto. Ad esempio, se il token fosse su Ethereum, optiamo per questa opzione.
Quindi, dalla schermata principale di Metamask clicchiamo sulla scritta Import tokens (evidenziata nell’immagine qui sopra). A questo punto, eccoci davanti alla finestra che segue.
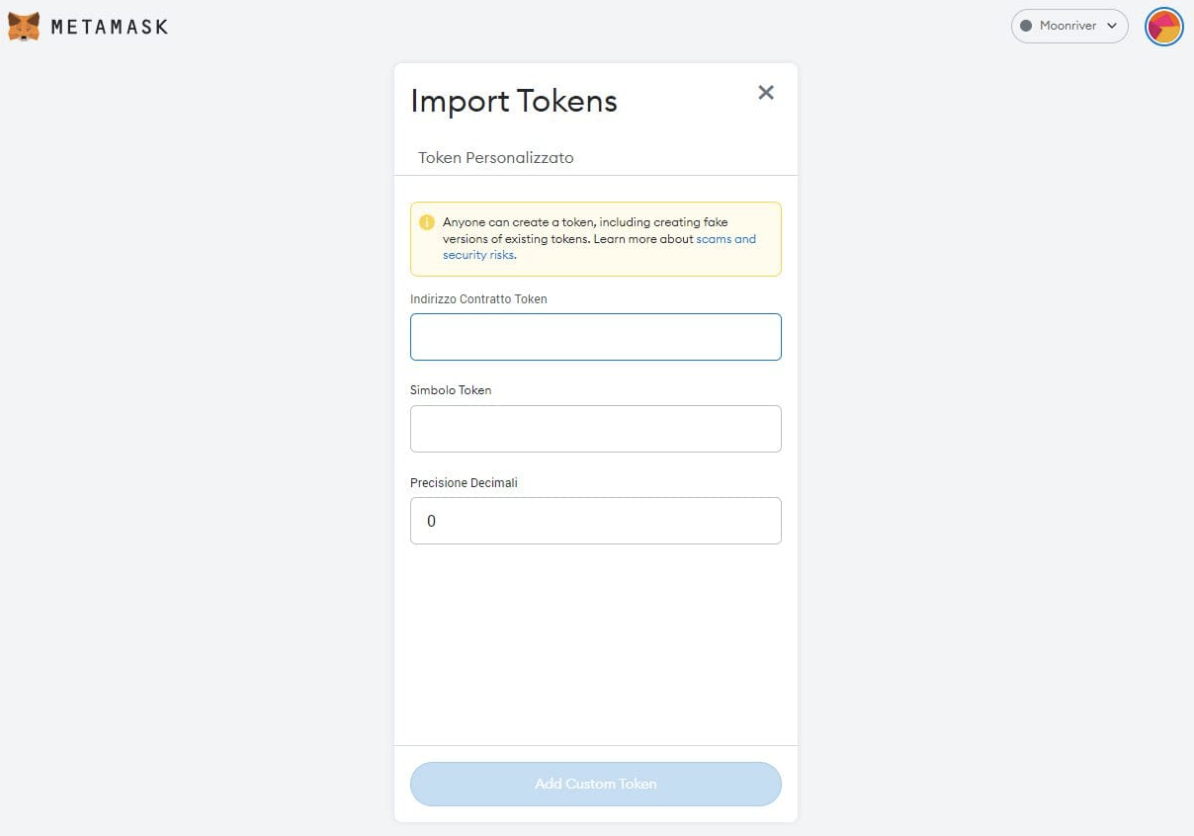
I campi compilabili sono tre. È comunque sufficiente riempire correttamente solo il primo per vedere gli altri aggiornarsi automaticamente. Perciò, incolliamo nell’area Indirizzo Contratto Token il numero del contratto dello stesso.
Ad esempio, Wrapped Bitcoin WBTC risponde al contratto 0x2260fac5e5542a773aa44fbcfedf7c193bc2c599 su blockchain Ethereum. Questo numero è ottenibile cercando la valuta di nostro interesse sui vari siti dedicati alla scansione delle transazioni, oppure su piattaforme come CoinMarketCap e CoinGecko, DEX (Uniswap, ecc.) e CEX come Binance.
Inseriti i dati, clicchiamo su Add Custom Token e confermiamo per concludere l’operazione. Fatto ciò, riusciremo a visualizzare correttamente il token appena importato.
Questa facile procedura vale per tutte le blockchain supportate da Metamask. L’unico punto a cui prestare massima attenzione è il numero del contratto: deve essere corretto e proveniente da fonti affidabili.
Come trasferire da Binance a MetaMask
Spostare criptovalute da Binance (o altro exchange) su MetaMask è molto facile.
Su MetaMask dovremo compiere una sola azione: copiare l’address abbinato al portafoglio. Questo andrà poi incollato/ricopiato nel campo “destinatario” in fase di creazione della transazione sull’exchange.
Ad esempio, ecco la procedura pre trasferire ETH (su rete Ethereum) da Binance a MetaMask:
- Entriamo nello spot wallet del nostro account Binance.
- Cerchiamo ETH e scegliamo l’opzione Withdraw.
- A questo punto, indichiamo rete, quantità e indirizzo del ricevente (l’address di cui poco sopra).
- Confermiamo la transazione.
- Dopo una certa attesa, ecco che gli ETH arriveranno sul wallet MetaMask. Le tempistiche variano in base al network scelto, alla sua congestione e anche al carico di lavoro dell’exchange.
Rimandiamo ai tutorial (in costante espansione) per le operazioni di prelievo da un determinato exchange.
MetaMask è sicuro? Rischi e best practice 2026
Chiudiamo questo lungo viaggio su MetaMask esplorandolo lato sicurezza.
Metamask è sicuro? Sia come app Mobile che come estensione browser, questo wallet non custodial offre ottimi standard di sicurezza.
Ormai MetaMask ha una lunga esperienza e il tempo ha dimostrato che si tratta di un buon software.
Solitamente, quando un utente perde i fondi non è a causa del wallet di per sé, ma di errori umani o problemi/attacchi relativi alle piattaforme che si utilizzano.
Dagli exploit alle campagne di phishing, i fondi possono essere compromessi ma non a causa del wallet MetaMask. Facendo le cose per bene saremo al riparo da eventi spiacevoli e indesiderati.
Una nota doverosa: la versione mobile è a nostro avviso più esposta rispetto all’estensione browser. Perciò, massima attenzione se si intende utilizzarla: non lasciare incustodito lo smartphone, proteggerlo con password e bloccarlo immediatamente da remoto in caso di furto o smarrimento.
Queste sono solo alcune delle best practice fondamentali per non incorrere in rischi eccessivi.
Per aumentare la sicurezza, l’hardware wallet Ledger è una soluzione perfetta. Nel negozio Ledger trovi i due modelli proposti dal famoso brand: Nano X e Nano S Plus.
Impostazioni di MetaMask
Per accedere alle impostazioni di MetaMask ci basterà cliccare sull’immagine del nostro account in alto a destra e scorrere il menu a tendina fino a trovare la classica icona dell’ingranaggio.
Una volta all’interno, abbiamo diverse possibilità. Una breve descrizione per ognuna di esse dovrebbe farvi capire più o meno che cosa potrete aspettarvi:
- Generale: possibilità di personalizzare la vostra Home
- Avanzate: da questa funzione è possibile accedere alle varie impostazioni più tecniche come scaricare i log di stato e le transazioni, sincronizzare con dispositivo mobile, ripristinare account (visto nel paragrafo precedente), poter controllare il GAS durante le funzioni di scambio o conferma, impostare un timer di log out e creare un bridge con il nostro Ledger.
- Contatti: ci permette di aggiungere dei contatti salvati per poter trasferire i nostri fondi in maniera rapita e facile senza dover ogni volta ad andare a copiare l’indirizzo del destinatario.
- Sicurezza & Privacy: modificare le impostazioni di sicurezza del wallet o di privacy e rilevare le nostre seed phrase
- Avvisi: disattivare/attivare le notifiche
- Reti: aggiungere o eliminare dei network impostati sul nostro MetaMask
- Informazioni: contatti e assistenza dell’applicazione
Come dichiarare MetaMask nella dichiarazione dei redditi
Per i residenti fiscali in Italia, il possesso di criptovalute è soggetto ad obbligo di report della dichiarazione dei redditi.
Ciò include non solo le criptovalute possedute presso terze parti autorizzate e regolamentate sul territorio, bensì anche le criptovalute custodite tramite autocustodia su qualsiasi tipologia di wallet.
Le criptovalute possedute su Metamask, infatti, sono soggette ad obbligo dichiarativo. Nello specifico, la “crypto dichiarazione redditi” passa dal Quadro RW o dal Quadro W. Il primo si compila tramite il Modello Redditi PF (Persone Fisiche), mentre il secondo passa dal Modello 730. Entrambi i quadri sono pensati per assolvere all’obbligo del monitoraggio fiscale.
La dichiarazione delle criptovalute possedute su Metamask, così per le criptovalute sotto diverse tipologie di custodia, avvengono attraverso la dichiarazione del valore iniziale delle nostre cripto-attività e quello finale al 31/12 nell’anno solare.
Per qualsiasi dettaglio specifico, consulta la nostra guida completa sulla Tassazione criptovalute in Italia per non incorrere in errori e in possibili sanzioni.
Per recuperare i valori del saldo al 31/12, è possibile esportare i file CSV direttamente dagli explorer come Etherscan.io per la blockchain di Ethereum. Se si possiedono criptovalute su diverse reti, sarà necessario scaricare anche i documenti relativi a tutte le reti in cui possediamo criptovalute
La dichiarazione, tuttavia, non è mai semplice e molte volte, trovare il commercialista adatto è un vero dramma. Per questo motivo consigliamo di utilizzare Tatax, software sulla fiscalità crypto che compila in automatico i quadri che servono, togliendoti tanti pensieri: prova subito Tatax!
Domande Frequenti
Metamask è uno dei software wallet più sicuri sul mercato, con un maggior storico ed il maggior numero di utenti. Tuttavia, come in ogni software wallet, la generazione della seed phrase avviene online e resta presente all’interno del dispositivo.
Per questo motivo, è consigliabile utilizzare Metamask in combo con un hardware wallet come Ledger o Trezor per un ottimo grado di sicurezza.
Metamask è un software wallet completamente gratuito. Non c’è alcun costo per il download né per l’utilizzo, ad eccezione delle gas fee necessarie per effettuare transazioni sulla blockchain.
Per aggiungere BNB Smart Chain a Metamask è necessario selezionare la voce “reti” e cliccare su “+ add custom network”.
Bisogna quindi inserire i dati relativi al network, come Chain id, RPC e URL del block explorer. Soluzioni come Chainlist.org ci permettono di aggiungere BSC in due click.
Si, le criptovalute possedute su MetaMask devono essere dichiarate nel quadro RW nella propria dichiarazione dei redditi. Tutte le informazioni nel nostro articolo su Tassazione criptovalute in Italia. Per supporto pratico, quadri precompilati e calcolo dei valori puoi consultare Ta.tax!
Conclusioni su Metamask Wallet
Come noteremo di certo utilizzando l’estensione MetaMask, tutto funziona perfettamente.
Rispetto a gran parte dei competitor, questo wallet è un passo avanti sotto molto aspetti. Troveremo solo dei piccoli problemi quando interagiremo su network diversi da Ethereum, sua rete nativa.
L’integrazione su diversi network permette un utilizzo in quasi tutte le DApp del mondo, cosa che potrà solo migliorare visto il successo che MetaMask ha avuto: moltissimi utenti lo utilizzano ed è certamente a vantaggio delle nuove applicazioni nascenti integrarlo.
Un problema degno di nota è sicuramente rappresentato dal support: meglio sperare di non averci mai niente a che fare! Lento e non sempre preciso.
Nonostante questa pecca, MetaMask è un must per quasi tutti i membri della community che detiene delle criptovalute, di conseguenza il mio esito non può che essere positivo su questo wallet che trasmette sicurezza da ogni pixel.